How To Make An Amazing Custom Menu Bar For Your Mac With Sketchybar
developer-toolsmacossketchybarmenu-bardotfilesshell-scriptingcustomization
Verdict: A step-by-step build of a SketchyBar menu bar from an empty config, covering bar and item properties, timed and event-driven plugin scripts, app-icon fonts, per-display space items and a scrolling media item, with eight color schemes
TL;DR
- Josean Martinez (Jan 2024) builds a custom macOS menu bar with SketchyBar from an empty config. The finished bar shows spaces with icons for the apps open in each, the front app, the playing song with scrolling text, CPU, battery, volume, and the date and time.
- Setup comes first: SketchyBar from Homebrew, the example config copied to
~/.config/sketchybar, the Hack Nerd Font, jq, the macOS menu bar set to hide automatically, and a top gap in the window manager (yabai or Rectangle) so windows don't cover the bar. sketchybarrcholds the bar's properties and default item properties. Josean moves colors intocolors.sh(eight schemes in ARGB) and each item into its own file underitems/, whichsketchybarrcsources.- Items update in two ways:
update_freqruns the item's script every N seconds (calendar every 30, CPU every 2), andsubscriberuns it on an event such asvolume_change,front_app_switchedorspace_windows_change. Scripts read$NAME,$SENDER,$INFOand, for spaces,$SELECTED. - App icons come from sketchybar-app-font and its
icon_map_fn.sh, which turns an app name into a font ligature. SF Pro and SF Symbols handle the rest of the text and icons.
Full summary
The bar being built
Josean opens on the finished bar, used mostly for reading information at a glance. On the left it shows every space on the Mac with the apps open in each, then the front app; the current song scrolls to the right of the notch, followed by CPU usage, battery, volume, and the date and time. SketchyBar supports mouse interactions, but this setup doesn't use them, and the original macOS menu bar still appears when the cursor touches the top of the screen. Josean made eight color schemes for the bar and a matching wallpaper pack. The code and commands are in a companion blog post.
Installing and making room
The install steps, all through Homebrew:
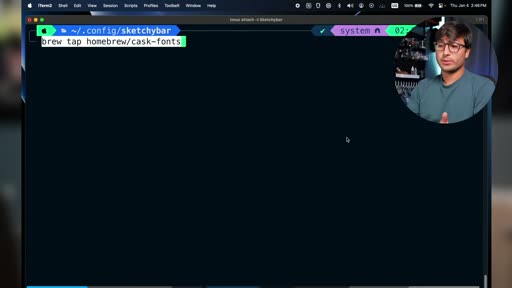
- tap SketchyBar's formula repository and
brew install sketchybar - copy the example configuration to
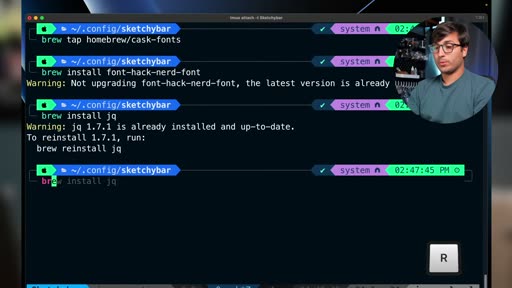
~/.config/sketchybar, which gives asketchybarrcfile and apluginsdirectory - install the Hack Nerd Font, the example config's default font, so its icons render
- install jq, a command-line JSON processor, for the event data later on
Next the default menu bar has to go. On macOS Sonoma the setting is in Control Center ("Automatically hide and show the menu bar", set to Always); on Ventura it is under Desktop & Dock. brew services start sketchybar then starts the bar as a service that launches at login, already showing the example config: spaces, the front app, battery, volume, and the date and time, with Nerd Font icons.
Josean strongly recommends a window manager alongside SketchyBar, one that can leave a gap between the top of the screen and maximized windows. With yabai, Josean's own choice, one config line declares an external bar of height 32 (SketchyBar's default), followed by a yabai service restart. Rectangle, which Josean calls simpler than yabai, needs a single command for a top gap of 32. The notch on Josean's laptop hides the difference, but on an external display windows stop overlapping the bar.
The config file and colors
Josean edits in Neovim and suggests VS Code otherwise. sketchybarrc is the file that matters: a Bash shebang at the top, a PLUGIN_DIR variable pointing to the plugins directory, a --bar block for the bar's height, position, padding and color, and a --default block setting the font, color and padding for every item. Items are the basic building blocks of SketchyBar, each with an icon and a label.
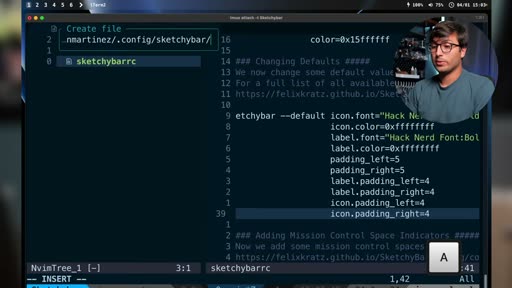
A new colors.sh (made executable with chmod +x) defines white plus eight color schemes, each with three variables: the bar color, the item background color and an accent color. SketchyBar takes colors in ARGB format, and its docs include a color picker. sketchybarrc sources the file, and the bar and default icon and label colors switch to those variables; sketchybar --reload applies each change. Josean then installs SF Pro, the macOS system font, and SF Symbols, Apple's icon library, and sets both item fonts to SF Pro Semibold 15. Finally, every example item is deleted, keeping the final sketchybar --update line, so the bar starts empty.
Items, scripts and update intervals
The first item is the calendar: sketchybar --add item calendar right, then --set with an SF Symbols icon and a label from the date command (%a %d %b %I:%M %p). Position can be left, center or right, or q and e for the left and right of a notch. New defaults give every item a background with a color, corner radius and height. The bar's height goes up to 37.
The label is static, though: it would always read Thursday, January 4, 3:25 PM. The fix is a plugin script. plugins/calendar.sh sets the label from date, using the $NAME variable SketchyBar passes with the name of the item that called it, and the item gets update_freq=30 and script="$PLUGIN_DIR/calendar.sh", so the date refreshes every 30 seconds. Josean then moves the item definition into items/calendar.sh, adds an ITEM_DIR variable, and sources each item file from sketchybarrc. That gives the pattern for the rest of the video: item definitions in items/, the scripts that update them in plugins/.
Events: volume, battery and CPU
The volume item adds subscribe, which ties it to an event, here volume_change, so its script runs whenever the volume changes. The example plugins/volume.sh checks $SENDER (the reason the script is running), reads the percentage from $INFO, and picks an icon by range: 60-100, 30-59, 1-29, otherwise muted. Josean swaps the icons for SF Symbols.
Battery combines both triggers: update_freq=120, plus subscriptions to system_woke and power_source_change, so it updates every two minutes, on wake, and when the charger is plugged in or out. Its script picks an icon by percentage and a different one while charging. The CPU item updates every two seconds with a script that comes from the community configs in the SketchyBar repository; Josean says "I didn't come up with this code myself" and recommends those configs for ideas.
Front app and spaces
App icons need sketchybar-app-font and a mapping function, icon_map_fn.sh, which turns an app name into what the font expects: Figma becomes :figma:. Josean adds a shebang and a line that calls the function with the first argument and echoes the result, so it works as a script. The front_app item sits on the left with the accent color as background and the app font for its icon, and subscribes to front_app_switched; its script sets the label to the app name from $INFO and the icon from the mapping script. The first reload fails because $PLUGIN_DIR isn't available inside plugin scripts; $CONFIG_DIR/plugins fixes it.
Spaces use one of SketchyBar's special components. A loop adds space.1 through space.10, and each space item only shows on the display its space is on, which helps with several monitors. space.sh reads $SELECTED to give the current space an accent background and leave the others plain. To show apps per space, a separator item subscribes to space_windows_change. Its space_windows.sh script uses jq to pull the space ID and its apps from $INFO, maps each app to an icon, and sets the result as that space's label. Josean shows it live: Notes opens in space one, moves to space three with a yabai shortcut, and disappears from the bar when closed.
Media, and switching color schemes
The last item shows the current song. It sits at e, right of the notch on Josean's 14-inch MacBook, with max_chars of 22 and scroll_texts on, so a long title scrolls every 15 seconds. It subscribes to media_change, which Josean notes was experimental at the time. media.sh uses jq to read the state, and while something plays it sets the label to title and artist and turns drawing on; otherwise it hides the item.
To switch color schemes, uncomment a different one in colors.sh and reload. Josean switches from teal to gray and picks the matching wallpaper, "the general idea of having them match."
Key moments
- [00:01] The finished bar — spaces with app icons, front app, music, CPU, battery, volume, date. frame_0001.jpg
- [01:28] Install — Homebrew, the example config, Hack Nerd Font and jq. frame_0004.jpg
- [03:29] Hide the macOS menu bar — Control Center on Sonoma, Desktop & Dock on Ventura.
- [04:41] Window manager gap — yabai's external bar setting or a Rectangle gap of 32.
- [07:01]
sketchybarrc— bar properties, default item properties,PLUGIN_DIR. frame_0007.jpg - [08:53]
colors.sh— eight ARGB schemes of bar, item and accent colors. frame_0009.jpg - [13:38] First item — the calendar, labelled with
date, then refreshed every 30 seconds by a plugin script. frame_0017.jpg - [22:17] Subscribe to events — the volume item runs its script on
volume_change. frame_0021.jpg - [36:55] Space components —
space.1tospace.10, highlighted with$SELECTED. frame_0033.jpg - [43:23] Media item — scrolling title and artist right of the notch, on
media_change. frame_0039.jpg
Hook microscope (0-10s)
-
Frames: 20 at 2 fps
Read these hook frames with the Read tool:
hook_frames/frame_0001.jpg(t=0.0s)hook_frames/frame_0002.jpg(t=0.5s)hook_frames/frame_0003.jpg(t=1.0s)hook_frames/frame_0004.jpg(t=1.5s)hook_frames/frame_0005.jpg(t=2.0s)hook_frames/frame_0006.jpg(t=2.5s)hook_frames/frame_0007.jpg(t=3.0s)hook_frames/frame_0008.jpg(t=3.5s)hook_frames/frame_0009.jpg(t=4.0s)hook_frames/frame_0010.jpg(t=4.5s)hook_frames/frame_0011.jpg(t=5.0s)hook_frames/frame_0012.jpg(t=5.5s)hook_frames/frame_0013.jpg(t=6.0s)hook_frames/frame_0014.jpg(t=6.5s)hook_frames/frame_0015.jpg(t=7.0s)hook_frames/frame_0016.jpg(t=7.5s)hook_frames/frame_0017.jpg(t=8.0s)hook_frames/frame_0018.jpg(t=8.5s)hook_frames/frame_0019.jpg(t=9.0s)hook_frames/frame_0020.jpg(t=9.5s)
-
Word-level transcript (39 words):
  [  0.01s] what's
  [  0.39s] up
  [  0.52s] you
  [  0.72s] guys
  [  0.99s] in
  [  1.08s] today's
  [  1.38s] video
  [  1.60s] i'm
  [  1.75s] going
  [  1.93s] to
  [  2.00s] be
  [  2.08s] sharing
  [  2.39s] with
  [  2.57s] you
  [  2.76s] everything
  [  3.06s] you
  [  3.13s] need
  [  3.28s] to
  [  3.44s] know
  [  3.60s] to
  [  3.77s] set
  [  4.03s] up
  [  4.16s] a
  [  4.24s] pretty
  [  4.80s] amazing
  [  5.28s] and
  [  5.52s] completely
  [  6.36s] custom
  [  6.80s] menu
  [  7.12s] bar
  [  7.35s] for
  [  7.60s] your
  [  7.94s] mac
  [  8.16s] with
  [  8.50s] a
  [  8.56s] tool
  [  8.88s] called
  [  9.36s] sketchy
  [ 10.00s] bar
- 0.0-4s: Josean at a desk in a teal T-shirt and glasses, talking to camera: "in today's video I'm going to be sharing with you everything you need to know to set up a pretty amazing and completely custom menu bar for your Mac."
- by 4.5s: Cut to a dark desktop with only the finished bar at the top; the view starts on the spaces at the left.
- by 9.5s: The view has panned right, past the scrolling track title next to the notch, toward battery and the clock, as Josean names "a tool called sketchy bar" and says it has been "pretty amazing."
Pattern: demo-first. The promise is spoken over the result, and the full bar is shown before any install step, so the viewer knows what 48 minutes will build.
Editorial profile
- Shots: 4
- Cuts/min: 0.08
- Mean shot length: 718.43s
- Median shot length: 325.98s
- Talking-head ratio: n/a (opencv not installed)
Screen-recorded terminal tutorial (iTerm2, tmux and Neovim) with a round webcam overlay in the top right and on-screen keystroke callouts, bookended by short to-camera segments; 0.08 cuts/min because nearly all of it is one continuous screen recording.
Quotable moments
- [00:44] "this is mostly for just viewing important information at a glance"
- [18:32] "within a script like this one we have a special environment variable called name that will have the name of the item that is invoking this script"
- [22:45] "because the volume item is now subscribed to this event its script will run whenever this event happens"
- [29:30] "I didn't come up with this code myself in the sketchy bar repository there's a bunch of examples from different people"
- [46:54] "the general idea of having them match"
Entities mentioned
- People: josean-martinez, Felix Kratz
- Companies: Apple
- Tools / products: sketchybar, sketchybar-app-font, Homebrew, Hack Nerd Font, jq, SF Pro, SF Symbols, yabai, Rectangle, Neovim, Visual Studio Code, iTerm2, tmux, Raycast, Spotlight, Figma, Notes
Concepts surfaced
- sketchybar-event-scripts: each item's script runs on a timer (
update_freq) or on a subscribed event, and reads$NAME,$SENDERand$INFOto update just that item. - Items and plugins split: item definitions in
items/, sourced fromsketchybarrc, and the scripts that update them inplugins/. - Special components: space items show only on the display that holds their space, and get
$SELECTEDto style the current one. - Font ligatures as icons: sketchybar-app-font maps an app name like
:figma:to its icon, so a script can turn window lists into an icon strip. - tiling-window-manager gap: the window manager has to keep maximized windows off the bar, through yabai's external bar setting or a Rectangle gap.
Frame timeline
What's said while each frame is on screen.
[00:00]

what's up you guys in today's video I'm going to be sharing with you everything you need to know to set up a pretty amazing and completely custom menu bar for your Mac with a tool called sketchy bar I've been using this for a little while now and it's been pretty amazing I'm going to be sharing with you all of the essential Concepts I think you should know to be able to put together your own custom menu bar in the specific video I'm going to be sharing with you how to put...
[02:59]
you'll want to run this following command first so that we can inst install nerd fonts through home brew and then to install the specific nerd font that sketchy bar uses you can use Brew install font dhack D nerd do font I already have it installed but if you don't it'll go ahead and install it we're also going to work with some Json information in our config to make this easier we're going to install a command line Json processor called JQ you can install it by doing Brew...
[04:11]
of the screen now we can start sketchy bar up by doing Brew services start sketchy bar this will start sketchy bar as a service so that it automatically starts when our computer starts up nice as you can see here we now have the default configuration at the top it shows the spaces I have on my computer which space I'm currently in which is number one the current APP I'm using which is iter 2 the battery percentage I have left on my computer the volume the date and the time...
[06:35]
but you can use whichever editor you prefer if you're not using neovim I would recommend Visual Studio code if you don't have it installed you can install it by using Brew install D- cask visual-studio-code and press enter as you can see I already have it installed once it's installed if you're located in the sketchy bar folder on your terminal then you can do code and Dot and then press enter and that will open it up in vs code I'm going to open it up with neovim by doing...
[08:58]
the file explorer and I'm going to add a new file here called color colors. sh in this file we'll Define some variables for colors that we'll be using for our bar I need to make this file an executable to do this I'm going to open up a new terminal pane I'm using t-o so I can create a horizontal pane here if you're using something like vs code you can open up the built-in terminal in VSS code or you can open up a separate terminal window I'm going to use my key map here to...
[10:10]
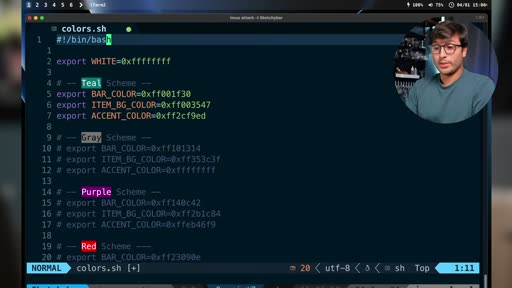
blog post in this file I'm defining several different variables that I'll be using for the color scheme of my bar I've Define a variable for the color white and then I have several different color schemes here there's eight different color schemes that I've put together for you guys each color scheme here has three variables you have the bar color which is the the background color of the bar itself and then the background color for the items in the bar and then an accent...
[12:34]
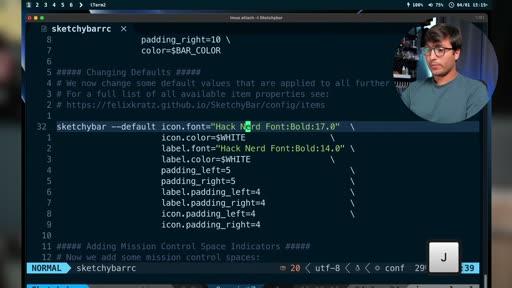
neovim maximize it and over here in the default font for the items icon I'm going to change this to SF Pro and it's going to be semi bold and a weight of 15 and same goes for the font of the label so I'm just going to copy this and replace the font that we have here for the label and I'm going to save this file I also want to remove all of the items that are configured for our bar so that we can start from from scratch and I can show you how to do this yourself so I'm going...
[14:58]
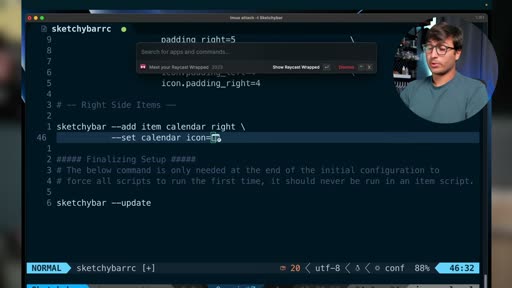
open up the SF symbols application which we installed earlier with home brew you can look it up with Spotlight or raycast you can type here SF symbols and you can open that up look for the icon that you want to use and copy and paste it into your editor then I'm going to add a back slash here to add another line and now we're going to set the label for the item this is going to be equal to the following we're going to use dollar sign and parentheses so that we can get the...
[17:21]
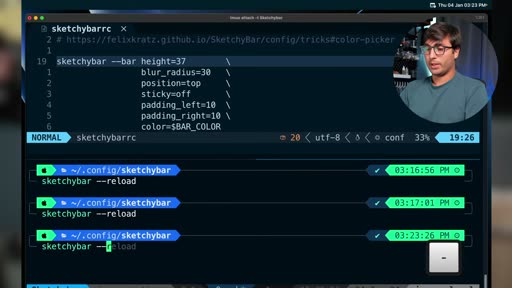
up my other terminal Pane and execute sketchy bar-- reload now the items on the bar have a background now a problem that we have with our current item is that it won't won't ever update it'll always say Thursday January 4th 3:25 p.m. but we don't want that we essentially want this to update at a given interval to do this we can go back up to our sketchy bar config we want to open up the file explorer and we want to set up a plugin for our calendar item our default...
[18:33]
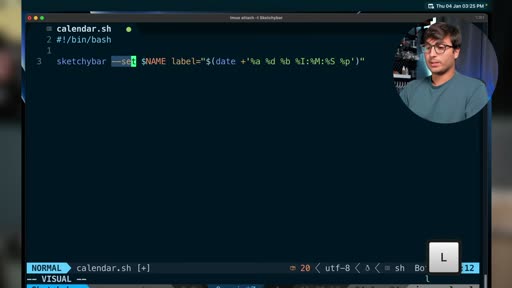
at the top then we're using sketchy bar-- set to update the properties of a given item then we need to specify the name of the item but within a script like this one we have a special environment variable called name that will have the name of the item that is invoking this script and then again we want to set the label equal to the output of the date command and then the same formatting options that we used earlier I'm going to save this file open up the file explorer go...
[20:57]
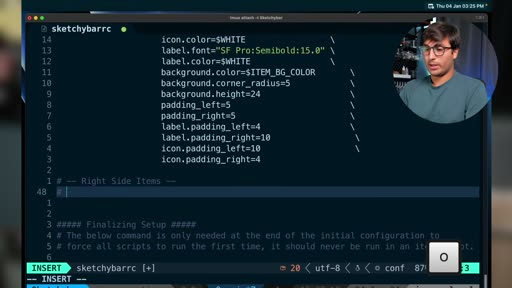
we do that I'm going to go to the bottom of this file and over here under right side items I'm I'm going to add the following it's going to be Source dollar sign itmore drir slash the name of the file for our item which is going to be calendar. sh so this essentially will run calendar. sh and add it to our bar let's save this file and then let's open up our other terminal Pane and run sketchy bar-- reload to update the bar with our changes I'm going to go back up into...
[23:20]
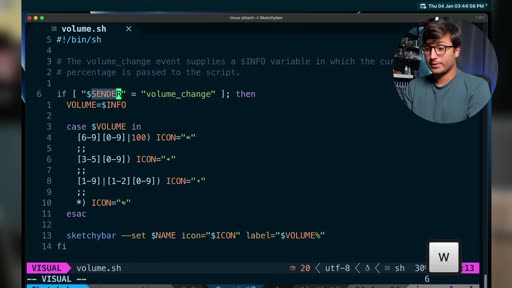
this special scripting variable in sketchy bar called sender the sender variable is the reason the script is executing so over here we're checking if the reason for execution is the volume change event if it is then we Define this variable called volume and assign it the value of the info variable some events in sketchy bar send additional information through the info variable in the case of the volume change event the info variable will have the current volume in percent...
[24:32]
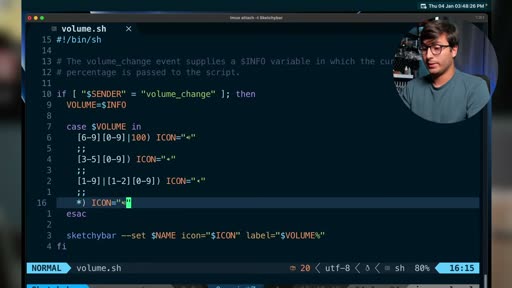
now I want to use the SF symbols library for these icons instead again you can look for these in the SF symbols app that we downloaded earlier or you can get them from my blog post I'm just going to paste them in here that's the first one this is the second one this is the third one and this is the one we'll use if the system is muted and then down here in the last line again we use the name variable to know which item is invoking this script we want to change its icon to...
[26:56]
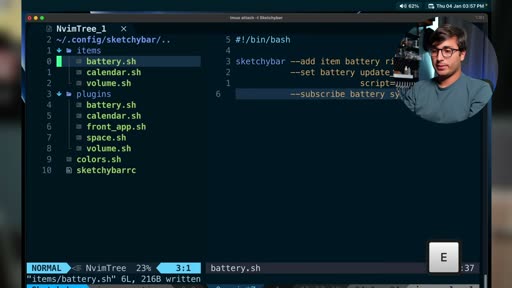
save this file let's open up the battery Dosh file under plug plugins so this variable here will have the current battery percentage this one will have whether or not the computer is charging If the percentage is an empty string we'll just exit and not do anything else and then down here if the percentage is between 90 and 100 we'll use this icon this one between 60 and 89 this one between 30 and 59 and then this one between 10 and 29 and in all other cases will show the...
[29:20]
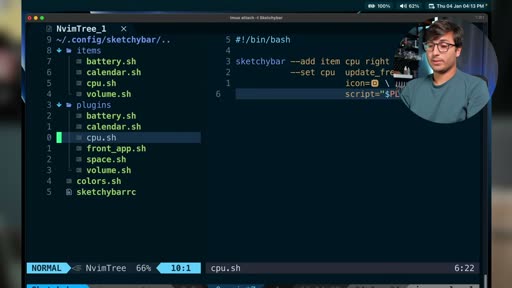
file called cpu. sh again we need to make this executable so I'm going to open up my other terminal pane go down here and use the up arrow and change items two plugins I'm going to go back into neovim maximize it and open up this new file I'm going to paste in the following code I didn't come up with this code myself in the sketchy bar repository there's a bunch of examples from different people and what they've done with their configs and you can find a lot of inspiration...
[30:32]
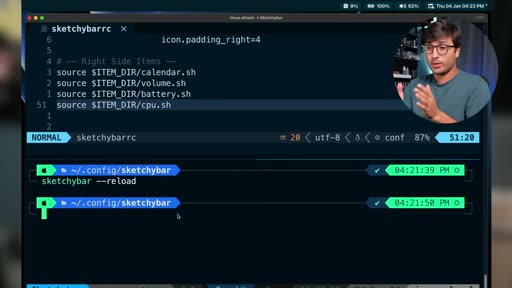
left side of the bar the first one is going to be for the current app that we're using but before we do this we're going to need to install the sketchy bar app font essentially this will allow us to take the name of an app and substitute it with an icon for it to install it you'll run the following command let's press enter to execute it and then we'll use this next command to install a mapping function that will map from a name to an icon in the f font that we just...
[32:55]
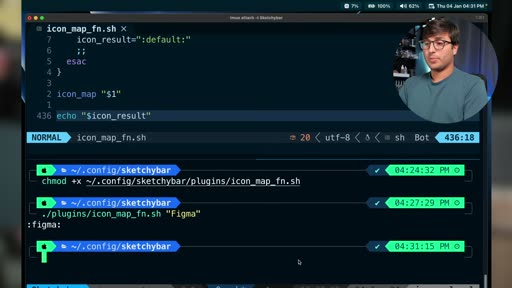
Colin figma colon to find the matching icon for figma I'm going to go back up into neovim open the file explorer and under items I'm going to add a new one called front app which we're going to use to show the current active application down here I'm going to do chmod up arrow and change this to items and the file is called front uncore app I'm going to go back up into neovim maximize it open up this file and now I'm going to add the following you'll see here that we're...
[35:19]
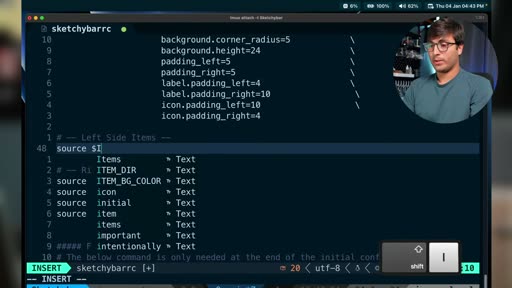
items and we're going to add here Source the value of item uncore directory slf frore app. sh let's say save this and then let's open up our other terminal Pane and let's run sketchy bar-- reload to see our changes it looks like we made a mistake in the front app script let's go back up to neovim open up the file explore and go to front app. sh under plugins and the problem is with this plugin uncore directory variable because we don't have access to it let's change this to...
[37:43]
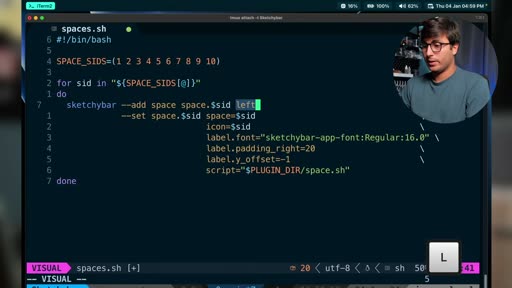
it'll be space do1 and we're going to place it on the left side of the screen then we're going to use set to update some of its properties we need to use the name of the space and then this special property called space needs to be equal to the ID of the space the icon for will be the ID as well and then the font for the label will be the sketchy bar app font because we want to display all of the different icons for the apps within a given space I'm also adding some extra...
[38:54]
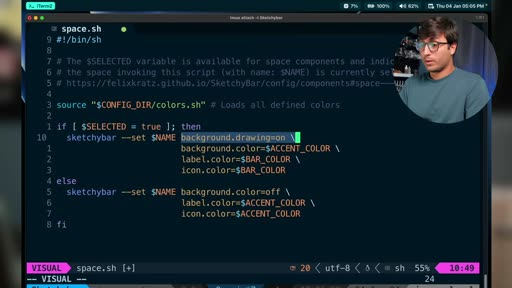
background to show so we said background. drawing to on I want the color color of the background to be our accent color and the color for the label and the icon to be the bar color if it isn't selected I want the background to be turned off this should be drawing and the color of the label and the icon to be the accent color now let's save this open up the file explorer go down to sketchy bar RC and then let's copy this line and paste it below it and we're going to change...
[41:18]
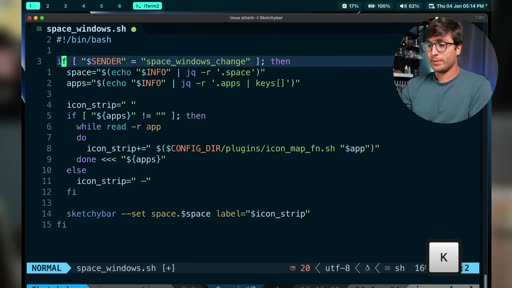
new file and we're going to add the following code over here we have an if statement that checks if the event executing the script is the space Windows change event we're using JQ which is the Json processor that we installed in the beginning of this video to get the ID of the space from Json information that is stored in the info variable and then down here we're getting the apps that are found in that space if apps isn't empty then we use a while loop to read through them...
[43:42]
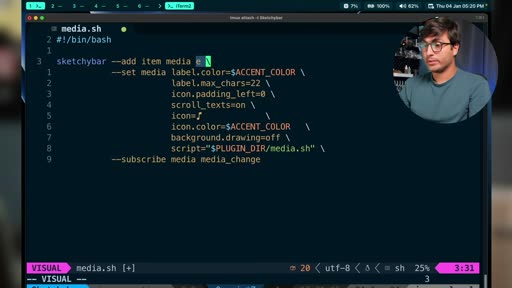
called media and we're using e to place it to the right of the notch you can use Center instead but because my 14in MacBook has a notch I'm using this instead if you want to do left side of the notch you can use Q then we're going to set some properties for the media item the label color is is going to be the accent color we're going to set a Max characters property so if the current song that's playing is way too long we just truncate it to 22 characters padding of the...
[44:54]
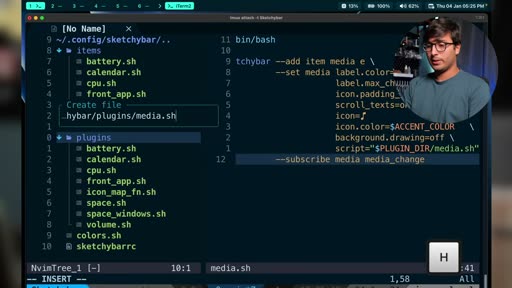
plugins I'm going to add a new file called media. sh this is going to be for our scen script I'll open up the other terminal Pane and write out chmod use up arrow and this is going to be plugins instead of items awesome let's go back into neovim maximize it open up this file and I'm going to add the following code again the info variable is a Json string and we're using JQ to process it and get the state of the media if state is is playing then we want to get the title and...
[47:46]

channel to see more content like this from me see you guys in the next one
Transcript
Source: captions.
[00:02] what's up you guys in today's video I'm going to be sharing with you everything
[00:03] going to be sharing with you everything you need to know to set up a pretty
[00:05] you need to know to set up a pretty amazing and completely custom menu bar
[00:07] amazing and completely custom menu bar for your Mac with a tool called sketchy
[00:10] for your Mac with a tool called sketchy bar I've been using this for a little
[00:12] bar I've been using this for a little while now and it's been pretty amazing
[00:14] while now and it's been pretty amazing I'm going to be sharing with you all of
[00:15] I'm going to be sharing with you all of the essential Concepts I think you
[00:17] the essential Concepts I think you should know to be able to put together
[00:18] should know to be able to put together your own custom menu bar in the specific
[00:21] your own custom menu bar in the specific video I'm going to be sharing with you
[00:22] video I'm going to be sharing with you how to put together this setup it has
[00:24] how to put together this setup it has all of the spaces that I have on my
[00:26] all of the spaces that I have on my computer which apps are open in each
[00:28] computer which apps are open in each space with the current application I'm
[00:30] space with the current application I'm using is what song I have currently
[00:33] using is what song I have currently playing with a pretty cool scrolling
[00:35] playing with a pretty cool scrolling text animation the CPU usage of my
[00:38] text animation the CPU usage of my computer how much battery I have left
[00:40] computer how much battery I have left the volume of my computer as well as the
[00:42] the volume of my computer as well as the current date and time though you can set
[00:44] current date and time though you can set up Mouse interactions with sketchy bar I
[00:47] up Mouse interactions with sketchy bar I haven't done this in this particular
[00:49] haven't done this in this particular setup this is mostly for just viewing
[00:51] setup this is mostly for just viewing important information at a glance if I
[00:53] important information at a glance if I ever need to access something in the
[00:54] ever need to access something in the original Mac OS menu bar with the mouse
[00:57] original Mac OS menu bar with the mouse you can just take the cursor to the top
[00:58] you can just take the cursor to the top of the screen and it'll show up again
[01:00] of the screen and it'll show up again I've put together eight different color
[01:02] I've put together eight different color schemes for the menu bar as well as a
[01:04] schemes for the menu bar as well as a wallpaper pack with these eight
[01:06] wallpaper pack with these eight different color schemes to go with the
[01:08] different color schemes to go with the menu bar as well if you're interested in
[01:10] menu bar as well if you're interested in getting the wallpaper pack I'll have it
[01:12] getting the wallpaper pack I'll have it linked in the description I'll also have
[01:14] linked in the description I'll also have all of the code I'm using in this video
[01:16] all of the code I'm using in this video Linked In the description as well as a
[01:19] Linked In the description as well as a link to a blog post where you can copy
[01:21] link to a blog post where you can copy and paste any of the commands and code
[01:23] and paste any of the commands and code I'm using and easily follow along with
[01:26] I'm using and easily follow along with me with that said let's get started all
[01:28] me with that said let's get started all right you guys so the first thing we
[01:30] right you guys so the first thing we want want to do before we get started is
[01:32] want want to do before we get started is to make sure we have Homebrew installed
[01:34] to make sure we have Homebrew installed on our machines to do this you can run
[01:36] on our machines to do this you can run the following command this commands
[01:38] the following command this commands along with any other commands I'll be
[01:40] along with any other commands I'll be executing in this video will be in the
[01:42] executing in this video will be in the blog post I'll have Linked In the
[01:44] blog post I'll have Linked In the description I'm going to go ahead and
[01:46] description I'm going to go ahead and execute this now if you're using an
[01:48] execute this now if you're using an apple silicon MacBook then you'll also
[01:50] apple silicon MacBook then you'll also have to add home R to your path to do
[01:53] have to add home R to your path to do this you can run this following command
[01:55] this you can run this following command and then this one again these will be in
[01:58] and then this one again these will be in the blog post now that we have home BR
[02:00] the blog post now that we have home BR installed we're ready to install sketchy
[02:02] installed we're ready to install sketchy bar but to be able to install it you'll
[02:03] bar but to be able to install it you'll also have to execute this following
[02:05] also have to execute this following command this will allow home R to
[02:07] command this will allow home R to install sketchy bar and then you can run
[02:09] install sketchy bar and then you can run Brew install sketchy bar after sketchy
[02:13] Brew install sketchy bar after sketchy bar is installed we want to copy the
[02:15] bar is installed we want to copy the example configuration to our home
[02:17] example configuration to our home directory to do this we can execute
[02:19] directory to do this we can execute these following commands I'm just going
[02:21] these following commands I'm just going to copy them paste them down here and
[02:24] to copy them paste them down here and press enter and then I'm going to move
[02:26] press enter and then I'm going to move into the config directory which is where
[02:29] into the config directory which is where the config will be located so I'm going
[02:31] the config will be located so I'm going to do cd. config and then within the do
[02:34] to do cd. config and then within the do config directory the configuration
[02:36] config directory the configuration should be in a new directory called
[02:38] should be in a new directory called sketchy bar and if I run LS you'll see a
[02:41] sketchy bar and if I run LS you'll see a sketchy bar RC file and a plugins
[02:44] sketchy bar RC file and a plugins directory these make up the example
[02:46] directory these make up the example configuration we'll be building ours off
[02:48] configuration we'll be building ours off of this one now you also want to install
[02:50] of this one now you also want to install the default font for sketchy bar it's
[02:52] the default font for sketchy bar it's going to be a nerd font so that the
[02:54] going to be a nerd font so that the icons can work properly to do this
[02:57] icons can work properly to do this you'll want to run this following
[02:58] you'll want to run this following command first so that we can inst
[03:00] command first so that we can inst install nerd fonts through home brew and
[03:02] install nerd fonts through home brew and then to install the specific nerd font
[03:05] then to install the specific nerd font that sketchy bar uses you can use Brew
[03:07] that sketchy bar uses you can use Brew install font dhack D nerd do font I
[03:12] install font dhack D nerd do font I already have it installed but if you
[03:14] already have it installed but if you don't it'll go ahead and install it
[03:15] don't it'll go ahead and install it we're also going to work with some Json
[03:17] we're also going to work with some Json information in our config to make this
[03:19] information in our config to make this easier we're going to install a command
[03:21] easier we're going to install a command line Json processor called JQ you can
[03:24] line Json processor called JQ you can install it by doing Brew install JQ all
[03:27] install it by doing Brew install JQ all right now before we start up sketchy bar
[03:29] right now before we start up sketchy bar we want to H our default Mac menu bar in
[03:32] we want to H our default Mac menu bar in Mac OS Sonoma this is in the control
[03:35] Mac OS Sonoma this is in the control center settings so I'm going to open up
[03:37] center settings so I'm going to open up raycast on my computer if you don't have
[03:39] raycast on my computer if you don't have rcast this will open up Spotlight
[03:41] rcast this will open up Spotlight instead you can use command space and
[03:44] instead you can use command space and then I'm going to look for Control
[03:46] then I'm going to look for Control Center and press enter if you have Mac
[03:49] Center and press enter if you have Mac OS Ventura the setting will be located
[03:51] OS Ventura the setting will be located in the desktop and Doc settings instead
[03:54] in the desktop and Doc settings instead I'm going to go down here to the bottom
[03:56] I'm going to go down here to the bottom and where it says automatically hide and
[03:58] and where it says automatically hide and show the menu bar I'm going to change
[03:59] show the menu bar I'm going to change this this to always and as you can see
[04:02] this this to always and as you can see I'm going to close the settings here our
[04:03] I'm going to close the settings here our Mac OS menu bar is hidden and it'll only
[04:06] Mac OS menu bar is hidden and it'll only show up if you put the cursor to the top
[04:08] show up if you put the cursor to the top of the screen now we can start sketchy
[04:10] of the screen now we can start sketchy bar up by doing Brew services start
[04:14] bar up by doing Brew services start sketchy bar this will start sketchy bar
[04:16] sketchy bar this will start sketchy bar as a service so that it automatically
[04:18] as a service so that it automatically starts when our computer starts up nice
[04:21] starts when our computer starts up nice as you can see here we now have the
[04:23] as you can see here we now have the default configuration at the top it
[04:25] default configuration at the top it shows the spaces I have on my computer
[04:29] shows the spaces I have on my computer which space I'm currently in which is
[04:31] which space I'm currently in which is number one the current APP I'm using
[04:33] number one the current APP I'm using which is iter 2 the battery percentage I
[04:36] which is iter 2 the battery percentage I have left on my computer the volume the
[04:38] have left on my computer the volume the date and the time in 24-hour format and
[04:41] date and the time in 24-hour format and these icons all work because we
[04:43] these icons all work because we installed the hack nerd font now before
[04:47] installed the hack nerd font now before I continue I want to point out that I
[04:49] I continue I want to point out that I would highly recommend you use some sort
[04:51] would highly recommend you use some sort of window management solution along with
[04:54] of window management solution along with sketchy bar I'm currently using ybi
[04:56] sketchy bar I'm currently using ybi which is a tying Window Manager for Mac
[04:59] which is a tying Window Manager for Mac OS and the specific Window Manager ties
[05:01] OS and the specific Window Manager ties in really nicely with sketchy bar you
[05:04] in really nicely with sketchy bar you can also use other window managers like
[05:07] can also use other window managers like rectangle for example you'll want one
[05:09] rectangle for example you'll want one that will allow you to set a gap between
[05:11] that will allow you to set a gap between the top of the screen and a maximized
[05:13] the top of the screen and a maximized window so that windows don't overlap
[05:16] window so that windows don't overlap your custom menu bar I have a full
[05:18] your custom menu bar I have a full tutorial on your buai on my channel
[05:20] tutorial on your buai on my channel which I'll have Linked In the
[05:21] which I'll have Linked In the description as well if you're using your
[05:23] description as well if you're using your buai like me you should make a change to
[05:25] buai like me you should make a change to your config I've opened it up here in
[05:27] your config I've opened it up here in neovim I'm going to go down to the
[05:29] neovim I'm going to go down to the bottom and I'm going to add the
[05:31] bottom and I'm going to add the following line this tells you by that
[05:33] following line this tells you by that I'm using an external bar and its height
[05:36] I'm using an external bar and its height is 32 which is the default for sketchy
[05:39] is 32 which is the default for sketchy bar I'm going to save this close neovim
[05:42] bar I'm going to save this close neovim and then you can do your bu-- restart
[05:45] and then you can do your bu-- restart service so that these changes are
[05:48] service so that these changes are accounted for you can't really see a
[05:49] accounted for you can't really see a difference here on my laptop because of
[05:51] difference here on my laptop because of the notch but on an external display
[05:53] the notch but on an external display windows won't be overlapping with
[05:55] windows won't be overlapping with sketchy bar anymore if you're using
[05:57] sketchy bar anymore if you're using something like rectangle which is a
[05:59] something like rectangle which is a pretty good window management option
[06:01] pretty good window management option that is simpler than you buy then you
[06:04] that is simpler than you buy then you can use this following command to tell a
[06:06] can use this following command to tell a rectangle to create a gap of 32 to the
[06:09] rectangle to create a gap of 32 to the top of the screen again this command as
[06:11] top of the screen again this command as all the others will be found in the blog
[06:13] all the others will be found in the blog post in the description all right now
[06:15] post in the description all right now I'm back here in my home directory sl.
[06:18] I'm back here in my home directory sl. config sketchy bar which is the location
[06:21] config sketchy bar which is the location of our sketchy bar config and now we can
[06:23] of our sketchy bar config and now we can start editing our configuration I'm
[06:26] start editing our configuration I'm going to be editing the configuration
[06:28] going to be editing the configuration with neovim Which is my editor of choice
[06:31] with neovim Which is my editor of choice but you can use whichever editor you
[06:33] but you can use whichever editor you prefer if you're not using neovim I
[06:35] prefer if you're not using neovim I would recommend Visual Studio code if
[06:37] would recommend Visual Studio code if you don't have it installed you can
[06:39] you don't have it installed you can install it by using Brew
[06:41] install it by using Brew install D- cask
[06:46] install D- cask visual-studio-code and press enter as
[06:49] visual-studio-code and press enter as you can see I already have it installed
[06:50] you can see I already have it installed once it's installed if you're located in
[06:52] once it's installed if you're located in the sketchy bar folder on your terminal
[06:55] the sketchy bar folder on your terminal then you can do code and Dot and then
[06:58] then you can do code and Dot and then press enter and that will open it up in
[07:00] press enter and that will open it up in vs
[07:02] vs code I'm going to open it up with neovim
[07:05] code I'm going to open it up with neovim by doing envm Dot and press enter now
[07:08] by doing envm Dot and press enter now this sketchy bar RC file is the most
[07:11] this sketchy bar RC file is the most important file it's what sketchy bar
[07:13] important file it's what sketchy bar uses for its configuration I'm going to
[07:15] uses for its configuration I'm going to open it up and to the top of this file
[07:18] open it up and to the top of this file I'm going to add a shebang line it's
[07:20] I'm going to add a shebang line it's going to look like pound exclamation
[07:23] going to look like pound exclamation mark SL bin SL bash this essentially
[07:27] mark SL bin SL bash this essentially tells Theos that it should use Bash to
[07:30] tells Theos that it should use Bash to execute all of the different commands in
[07:32] execute all of the different commands in this file now this first line of code
[07:34] this file now this first line of code you see here defines a variable so the
[07:36] you see here defines a variable so the value of plug-in uncore dur is the
[07:39] value of plug-in uncore dur is the absolute path to the plugins directory
[07:42] absolute path to the plugins directory you can see it here in our file explorer
[07:45] you can see it here in our file explorer it's this directory right here now if we
[07:48] it's this directory right here now if we go further down these lines essentially
[07:51] go further down these lines essentially set up the properties for the bar itself
[07:54] set up the properties for the bar itself and how it'll look you can see here that
[07:56] and how it'll look you can see here that the height of the bar will be of 32 if
[08:00] the height of the bar will be of 32 if the bar should be positioned at the top
[08:02] the bar should be positioned at the top or the bottom the padding to the left
[08:05] or the bottom the padding to the left padding to the right and what color of
[08:07] padding to the right and what color of the bar should be if you want to dive
[08:09] the bar should be if you want to dive deeper into all of the properties that
[08:11] deeper into all of the properties that you can Define here I'll have a link to
[08:13] you can Define here I'll have a link to the official documentation in the
[08:15] the official documentation in the description and then if we go further
[08:17] description and then if we go further down you'll see here some other lines it
[08:19] down you'll see here some other lines it uses D- default to define the default
[08:23] uses D- default to define the default properties of each item in the bar items
[08:26] properties of each item in the bar items are the basic building blocks of sketchy
[08:29] are the basic building blocks of sketchy bar they have icons and labels you can
[08:32] bar they have icons and labels you can see here that this defines the default
[08:34] see here that this defines the default font for the icon of each item the icon
[08:37] font for the icon of each item the icon color for each item the font of the
[08:40] color for each item the font of the label for each item the color of the
[08:43] label for each item the color of the label the items padding to the left to
[08:46] label the items padding to the left to the right the labels padding to the left
[08:49] the right the labels padding to the left and to the right and the icons padding
[08:51] and to the right and the icons padding to the left and to the right I'm going
[08:53] to the left and to the right I'm going to save this file and I'm going to open
[08:56] to save this file and I'm going to open the file explorer and I'm going to add a
[08:58] the file explorer and I'm going to add a new file here called color colors. sh in
[09:01] new file here called color colors. sh in this file we'll Define some variables
[09:03] this file we'll Define some variables for colors that we'll be using for our
[09:06] for colors that we'll be using for our bar I need to make this file an
[09:08] bar I need to make this file an executable to do this I'm going to open
[09:10] executable to do this I'm going to open up a new terminal pane I'm using t-o so
[09:14] up a new terminal pane I'm using t-o so I can create a horizontal pane here if
[09:17] I can create a horizontal pane here if you're using something like vs code you
[09:19] you're using something like vs code you can open up the built-in terminal in VSS
[09:22] can open up the built-in terminal in VSS code or you can open up a separate
[09:24] code or you can open up a separate terminal window I'm going to use my key
[09:26] terminal window I'm going to use my key map here to create a new horizontal
[09:28] map here to create a new horizontal split and then I'm going to use
[09:30] split and then I'm going to use chmod followed by plus X to make the
[09:33] chmod followed by plus X to make the file in executable and it's located in
[09:36] file in executable and it's located in our home directory
[09:38] our home directory sl. config SL sketchy bar SLC colors. sh
[09:45] sl. config SL sketchy bar SLC colors. sh I could have also used something like
[09:47] I could have also used something like the
[09:48] the following but to make sure that it
[09:50] following but to make sure that it applies to the right file for you no
[09:52] applies to the right file for you no matter where you are in the terminal I
[09:54] matter where you are in the terminal I use the absolute path instead now I'm
[09:56] use the absolute path instead now I'm going to go back up to neovim maximize
[09:58] going to go back up to neovim maximize it and open up this colors. sh file and
[10:02] it and open up this colors. sh file and I'm going to add the following code
[10:05] I'm going to add the following code again you can find all of this in the
[10:07] again you can find all of this in the blog post in this file I'm defining
[10:10] blog post in this file I'm defining several different variables that I'll be
[10:12] several different variables that I'll be using for the color scheme of my bar
[10:15] using for the color scheme of my bar I've Define a variable for the color
[10:17] I've Define a variable for the color white and then I have several different
[10:20] white and then I have several different color schemes here there's eight
[10:21] color schemes here there's eight different color schemes that I've put
[10:23] different color schemes that I've put together for you guys each color scheme
[10:25] together for you guys each color scheme here has three variables you have the
[10:28] here has three variables you have the bar color which is the the background
[10:30] bar color which is the the background color of the bar itself and then the
[10:32] color of the bar itself and then the background color for the items in the
[10:34] background color for the items in the bar and then an accent color as well of
[10:38] bar and then an accent color as well of course you can set up colors and Define
[10:40] course you can set up colors and Define them however you like sketchy bar uses
[10:42] them however you like sketchy bar uses the argb format for colors they have a
[10:45] the argb format for colors they have a handy Color Picker on their
[10:47] handy Color Picker on their documentation which I'll also have
[10:49] documentation which I'll also have Linked In the description if you want to
[10:50] Linked In the description if you want to explore different colors yourself all
[10:52] explore different colors yourself all right make sure you save this file then
[10:54] right make sure you save this file then let's go back to the sketchy bar RC file
[10:57] let's go back to the sketchy bar RC file I'm going to go back up to the top then
[10:59] I'm going to go back up to the top then you want to add the following line This
[11:02] you want to add the following line This Will essentially load all of the defined
[11:05] Will essentially load all of the defined colors in our colors Dosh file so that
[11:08] colors in our colors Dosh file so that we can access them within this file and
[11:10] we can access them within this file and some of the other files that we'll be
[11:11] some of the other files that we'll be creating in our config now I'm going to
[11:13] creating in our config now I'm going to go down here to the properties of a bar
[11:16] go down here to the properties of a bar itself and I want to change its color to
[11:19] itself and I want to change its color to the variable we defined as bar uncore
[11:23] the variable we defined as bar uncore color you should use the dollar sign
[11:25] color you should use the dollar sign here so that you get the value of this
[11:28] here so that you get the value of this variable and then I'm going to go down
[11:30] variable and then I'm going to go down here to the default properties of each
[11:32] here to the default properties of each item and I want this color for the icon
[11:35] item and I want this color for the icon to be doll sign white and same here for
[11:39] to be doll sign white and same here for the color of the label dollar sign white
[11:42] the color of the label dollar sign white I'm going to save this I'm going to open
[11:44] I'm going to save this I'm going to open up my other terminal Pane and I'm going
[11:46] up my other terminal Pane and I'm going to run sketchy
[11:49] to run sketchy bar-- reload so that so that our changes
[11:52] bar-- reload so that so that our changes are reflected on our bar I'm going to
[11:54] are reflected on our bar I'm going to execute this and now you can see here
[11:56] execute this and now you can see here that the color of the bar has changed
[11:58] that the color of the bar has changed now the next thing I want to do is
[12:00] now the next thing I want to do is change the font that we're going to be
[12:01] change the font that we're going to be using for the bar I want to use SF Pro
[12:04] using for the bar I want to use SF Pro which is the same font that Mac OS uses
[12:07] which is the same font that Mac OS uses to install it we can use Brew install f-
[12:11] to install it we can use Brew install f- sf- proo and I also want to install SF
[12:15] sf- proo and I also want to install SF symbols which is essentially an icon
[12:17] symbols which is essentially an icon library that is made to fit in very
[12:20] library that is made to fit in very nicely with the SF Pro font to install
[12:22] nicely with the SF Pro font to install it you can use Brew install D- Cask sf-
[12:28] it you can use Brew install D- Cask sf- symbols I'm going to go back up here to
[12:30] symbols I'm going to go back up here to neovim maximize it and over here in the
[12:34] neovim maximize it and over here in the default font for the items icon I'm
[12:37] default font for the items icon I'm going to change this to SF Pro and it's
[12:40] going to change this to SF Pro and it's going to be semi bold and a weight of 15
[12:45] going to be semi bold and a weight of 15 and same goes for the font of the label
[12:47] and same goes for the font of the label so I'm just going to copy this and
[12:49] so I'm just going to copy this and replace the font that we have here for
[12:51] replace the font that we have here for the label and I'm going to save this
[12:53] the label and I'm going to save this file I also want to remove all of the
[12:56] file I also want to remove all of the items that are configured for our bar so
[12:58] items that are configured for our bar so that we can start from from scratch and
[13:00] that we can start from from scratch and I can show you how to do this yourself
[13:02] I can show you how to do this yourself so I'm going to go down here to this
[13:03] so I'm going to go down here to this line that says adding mission control
[13:05] line that says adding mission control space indicators I'm going to start a
[13:08] space indicators I'm going to start a selection and I'm going to go down to
[13:10] selection and I'm going to go down to the
[13:12] the bottom but I don't want to delete this
[13:14] bottom but I don't want to delete this sketchy bar-- update so make sure you
[13:17] sketchy bar-- update so make sure you don't have that selected and then after
[13:20] don't have that selected and then after I've finished my selection I'm going to
[13:21] I've finished my selection I'm going to delete it now I'm going to save this
[13:24] delete it now I'm going to save this file open up my other terminal pane go
[13:27] file open up my other terminal pane go down into it and then I'm going to run
[13:29] down into it and then I'm going to run sketchy
[13:30] sketchy bar-- reload again you'll see now that
[13:33] bar-- reload again you'll see now that the bar is empty I'm going to go back up
[13:35] the bar is empty I'm going to go back up into neovim maximize it I'm going to add
[13:39] into neovim maximize it I'm going to add a new section down
[13:41] a new section down here it's going to be called right side
[13:45] here it's going to be called right side items as we're going to be defining the
[13:48] items as we're going to be defining the items that are going to go on the right
[13:51] items that are going to go on the right side of the bar the first item I want to
[13:53] side of the bar the first item I want to add here will show the date and time to
[13:56] add here will show the date and time to do this you can use sketchy bar followed
[13:59] do this you can use sketchy bar followed by D- add and then item so we're adding
[14:03] by D- add and then item so we're adding an item and then you specify the name of
[14:06] an item and then you specify the name of the item this is going to be called
[14:08] the item this is going to be called calendar and then you specify where it
[14:10] calendar and then you specify where it should go on the bar this is going to be
[14:12] should go on the bar this is going to be on the right hand side you can use left
[14:15] on the right hand side you can use left Center and right here or if you have a
[14:18] Center and right here or if you have a notch you can use q and e q is for the
[14:21] notch you can use q and e q is for the left of the notch e is for the right of
[14:23] left of the notch e is for the right of the notch this backs slash is important
[14:26] the notch this backs slash is important because it allows us to add a new line
[14:28] because it allows us to add a new line to the this command I'm going to press
[14:30] to the this command I'm going to press enter to go into a new line and then I'm
[14:33] enter to go into a new line and then I'm going to add here D- set so that we can
[14:37] going to add here D- set so that we can update the properties and then you have
[14:39] update the properties and then you have to specify the name of the item this is
[14:41] to specify the name of the item this is the same item we just added which is
[14:43] the same item we just added which is called
[14:44] called calendar then I want to set the icon for
[14:48] calendar then I want to set the icon for this item to be the following you can
[14:51] this item to be the following you can copy this from the blog post or you can
[14:54] copy this from the blog post or you can open up the SF symbols application which
[14:57] open up the SF symbols application which we installed earlier with home brew you
[15:00] we installed earlier with home brew you can look it up with Spotlight or raycast
[15:02] can look it up with Spotlight or raycast you can type here SF
[15:04] you can type here SF symbols and you can open that up look
[15:07] symbols and you can open that up look for the icon that you want to use and
[15:09] for the icon that you want to use and copy and paste it into your
[15:11] copy and paste it into your editor then I'm going to add a back
[15:14] editor then I'm going to add a back slash here to add another line and now
[15:17] slash here to add another line and now we're going to set the label for the
[15:19] we're going to set the label for the item this is going to be equal to the
[15:20] item this is going to be equal to the following we're going to use dollar sign
[15:23] following we're going to use dollar sign and parentheses so that we can get the
[15:26] and parentheses so that we can get the output of a command as our label the
[15:29] output of a command as our label the command we'll be using is the date
[15:31] command we'll be using is the date command which will allow us to get the
[15:32] command which will allow us to get the date and time that we want to show in
[15:34] date and time that we want to show in the bar to this command you can pass
[15:36] the bar to this command you can pass several different options I'll have a
[15:38] several different options I'll have a link in the description to the official
[15:40] link in the description to the official man page for the date command so you can
[15:43] man page for the date command so you can see all of the different formatting
[15:44] see all of the different formatting options that you can use in my case to
[15:47] options that you can use in my case to specify the formatting you should start
[15:49] specify the formatting you should start with a plus sign and I'm going to use
[15:51] with a plus sign and I'm going to use single quotes and the first formatting
[15:53] single quotes and the first formatting option I want to use is percent a for an
[15:56] option I want to use is percent a for an abbreviated day of the week percent
[15:59] abbreviated day of the week percent perent D for the day of the month
[16:01] perent D for the day of the month percent B for the abbreviated version of
[16:04] percent B for the abbreviated version of the current month's name then percent
[16:07] the current month's name then percent uppercase i for the hour in 12h hour
[16:10] uppercase i for the hour in 12h hour format colon and percent uppercase M for
[16:13] format colon and percent uppercase M for the minutes and then percent P to know
[16:16] the minutes and then percent P to know if it's AM or PM now I'm going to save
[16:19] if it's AM or PM now I'm going to save this open up my other terminal Pane and
[16:22] this open up my other terminal Pane and execute sketchy bar reload now you can
[16:25] execute sketchy bar reload now you can see here in our bar we have the calendar
[16:27] see here in our bar we have the calendar icon the day of the week the day of the
[16:29] icon the day of the week the day of the month what month is it and the time in
[16:32] month what month is it and the time in 12-hour format I also want to add a
[16:34] 12-hour format I also want to add a background to this item so I'm going to
[16:37] background to this item so I'm going to go back up to
[16:39] go back up to neovim and over here where we're setting
[16:41] neovim and over here where we're setting up the default properties for our items
[16:44] up the default properties for our items I want to add the following three
[16:47] I want to add the following three lines these will be in the blog post
[16:49] lines these will be in the blog post you'll see here that I'm setting up the
[16:52] you'll see here that I'm setting up the background color for each item then
[16:54] background color for each item then we're setting up a corner radius for the
[16:58] we're setting up a corner radius for the background and the height of the
[17:00] background and the height of the background then I also want to change
[17:02] background then I also want to change the padding right of the label to 10 and
[17:06] the padding right of the label to 10 and the padding left of the icon to 10 as
[17:09] the padding left of the icon to 10 as well finally I also want to make the bar
[17:11] well finally I also want to make the bar a bit taller I'm going to change this to
[17:15] a bit taller I'm going to change this to 37 and I'm going to save this file open
[17:18] 37 and I'm going to save this file open up my other terminal Pane and execute
[17:21] up my other terminal Pane and execute sketchy bar-- reload now the items on
[17:24] sketchy bar-- reload now the items on the bar have a background now a problem
[17:26] the bar have a background now a problem that we have with our current item is
[17:28] that we have with our current item is that it won't won't ever update it'll
[17:30] that it won't won't ever update it'll always say Thursday January 4th 3:25
[17:34] always say Thursday January 4th 3:25 p.m. but we don't want that we
[17:36] p.m. but we don't want that we essentially want this to update at a
[17:37] essentially want this to update at a given interval to do this we can go back
[17:40] given interval to do this we can go back up to our sketchy bar config we want to
[17:42] up to our sketchy bar config we want to open up the file explorer and we want to
[17:45] open up the file explorer and we want to set up a plugin for our calendar item
[17:48] set up a plugin for our calendar item our default configuration had this
[17:50] our default configuration had this clock. sh file for our clock I'm just
[17:54] clock. sh file for our clock I'm just going to delete this and start from
[17:56] going to delete this and start from scratch I'm going to remove this I'm
[17:58] scratch I'm going to remove this I'm going to add a new file under this
[18:00] going to add a new file under this directory called calendar. sh again you
[18:03] directory called calendar. sh again you need this to be executable so I'm going
[18:05] need this to be executable so I'm going to open up the other terminal pane go
[18:08] to open up the other terminal pane go down and down here I'm going to do
[18:10] down and down here I'm going to do change M mod plus X and I'm going to use
[18:13] change M mod plus X and I'm going to use this suggestion here instead of colors.
[18:16] this suggestion here instead of colors. sh this is going to be plugins SLC
[18:21] sh this is going to be plugins SLC calendar. sh I'm going to execute it I'm
[18:24] calendar. sh I'm going to execute it I'm going to go back up into neovim open up
[18:26] going to go back up into neovim open up this file and then I'm going to add the
[18:28] this file and then I'm going to add the file following code we have our shebang
[18:30] file following code we have our shebang at the top then we're using sketchy
[18:33] at the top then we're using sketchy bar-- set to update the properties of a
[18:36] bar-- set to update the properties of a given item then we need to specify the
[18:39] given item then we need to specify the name of the item but within a script
[18:41] name of the item but within a script like this one we have a special
[18:43] like this one we have a special environment variable called name that
[18:45] environment variable called name that will have the name of the item that is
[18:47] will have the name of the item that is invoking this script and then again we
[18:49] invoking this script and then again we want to set the label equal to the
[18:52] want to set the label equal to the output of the date command and then the
[18:55] output of the date command and then the same formatting options that we used
[18:58] same formatting options that we used earlier I'm going to save this file open
[19:00] earlier I'm going to save this file open up the file explorer go back to sketchy
[19:03] up the file explorer go back to sketchy bar
[19:03] bar RC then I'm going to go down to our
[19:07] RC then I'm going to go down to our calendar item and then instead of
[19:09] calendar item and then instead of setting the label down here I want to
[19:12] setting the label down here I want to remove this and I want to specify an
[19:14] remove this and I want to specify an update uncore frequency for this item
[19:19] update uncore frequency for this item this is going to be equal to 30 this is
[19:21] this is going to be equal to 30 this is in seconds so this will update every 30
[19:24] in seconds so this will update every 30 seconds and then I want to specify a
[19:27] seconds and then I want to specify a script this will be equal to the value
[19:30] script this will be equal to the value of the plugin uncore directory variable
[19:34] of the plugin uncore directory variable that we have defined at the top of this
[19:36] that we have defined at the top of this file SLC calendar. sh how this works
[19:40] file SLC calendar. sh how this works essentially is that every 30 seconds
[19:44] essentially is that every 30 seconds this script will get executed so every
[19:46] this script will get executed so every 30 seconds the date will get updated
[19:48] 30 seconds the date will get updated let's save this after we've saved this
[19:50] let's save this after we've saved this file I actually want to move this to a
[19:53] file I actually want to move this to a separate script I'm going to open up the
[19:55] separate script I'm going to open up the file explore and I'm going to add a new
[19:58] file explore and I'm going to add a new directory here called items and I'm
[20:00] directory here called items and I'm going to add a new file under items
[20:02] going to add a new file under items called calendar. sh again we need to
[20:06] called calendar. sh again we need to make this executable so I'm going to
[20:07] make this executable so I'm going to open up the terminal pane I'm going to
[20:10] open up the terminal pane I'm going to use the up Arrow to run the previous
[20:12] use the up Arrow to run the previous command and this is going to
[20:14] command and this is going to be items instead of plugins I'm going to
[20:17] be items instead of plugins I'm going to go back up close the file explorer and
[20:19] go back up close the file explorer and I'm going to copy these lines here open
[20:23] I'm going to copy these lines here open up the file explorer open up the new
[20:25] up the file explorer open up the new calendar. sh file and paste this code
[20:28] calendar. sh file and paste this code also going to add the shebang
[20:35] here now I'm going to open the file explorer again go back to sketchy bar
[20:37] explorer again go back to sketchy bar RC go up to the top I'm going to add a
[20:40] RC go up to the top I'm going to add a new variable here called itmore D and
[20:44] new variable here called itmore D and it's going to be equal to the value of
[20:48] it's going to be equal to the value of the config directory slash items after
[20:53] the config directory slash items after we do that I'm going to go to the bottom
[20:54] we do that I'm going to go to the bottom of this file and over here under right
[20:57] of this file and over here under right side items I'm I'm going to add the
[20:59] side items I'm I'm going to add the following it's going to be Source dollar
[21:02] following it's going to be Source dollar sign itmore drir slash the name of the
[21:06] sign itmore drir slash the name of the file for our item which is going to be
[21:09] file for our item which is going to be calendar. sh so this essentially will
[21:12] calendar. sh so this essentially will run calendar. sh and add it to our bar
[21:15] run calendar. sh and add it to our bar let's save this file and then let's open
[21:17] let's save this file and then let's open up our other terminal Pane and run
[21:20] up our other terminal Pane and run sketchy
[21:21] sketchy bar-- reload to update the bar with our
[21:24] bar-- reload to update the bar with our changes I'm going to go back up into
[21:26] changes I'm going to go back up into neovim maximize this all right so now we
[21:29] neovim maximize this all right so now we want to add some other items to our bar
[21:31] want to add some other items to our bar I'm going to open up the file explorer
[21:33] I'm going to open up the file explorer I'm going to add a new file here under
[21:35] I'm going to add a new file here under items it's going to be called volume. sh
[21:38] items it's going to be called volume. sh this is to show the current volume on
[21:40] this is to show the current volume on our computer again we need to make this
[21:42] our computer again we need to make this executable so I'm going to open up the
[21:44] executable so I'm going to open up the terminal Pane and we can use the up
[21:47] terminal Pane and we can use the up Arrow to look at previous commands this
[21:49] Arrow to look at previous commands this one should do and we're going to change
[21:51] one should do and we're going to change this calendar to volume. sh nice going
[21:55] this calendar to volume. sh nice going to go back up and maximize neovim you'll
[21:58] to go back up and maximize neovim you'll see here in the file explorer if I open
[22:00] see here in the file explorer if I open up plugins there's a volume. sh script
[22:03] up plugins there's a volume. sh script we'll just leave that there and make use
[22:05] we'll just leave that there and make use of it let's open up the volume Dosh file
[22:08] of it let's open up the volume Dosh file under items now I'm going to add the
[22:10] under items now I'm going to add the following so you'll see here that we're
[22:12] following so you'll see here that we're adding a new item its name is volume it
[22:16] adding a new item its name is volume it should go on the right and we're setting
[22:17] should go on the right and we're setting the script to be the volume Dosh script
[22:20] the script to be the volume Dosh script under the plugins directory now this
[22:22] under the plugins directory now this third line is a new one this is a
[22:25] third line is a new one this is a special option called subscribe where
[22:28] special option called subscribe where you specify the name of an item in this
[22:30] you specify the name of an item in this case it's the volume item and then you
[22:32] case it's the volume item and then you specify an event that you want to
[22:35] specify an event that you want to subscribe to there's a list of all of
[22:37] subscribe to there's a list of all of the different events you can subscribe
[22:39] the different events you can subscribe to for an item in sketchy bar the volume
[22:42] to for an item in sketchy bar the volume change event is pretty self-explanatory
[22:44] change event is pretty self-explanatory it happens whenever the volume changes
[22:46] it happens whenever the volume changes on your computer and what happens is
[22:48] on your computer and what happens is that because the volume item is now
[22:51] that because the volume item is now subscribed to this event its script will
[22:54] subscribed to this event its script will run whenever this event happens so this
[22:57] run whenever this event happens so this volume.
[22:58] volume. script will run whenever the volume
[23:01] script will run whenever the volume changes on our computer now let's save
[23:03] changes on our computer now let's save this file and let's take a look at the
[23:05] this file and let's take a look at the volume Dosh file under plugins let's go
[23:09] volume Dosh file under plugins let's go over here under plugins and open up the
[23:11] over here under plugins and open up the volume Dosh file you'll see here that we
[23:14] volume Dosh file you'll see here that we have an if statement and this checks
[23:17] have an if statement and this checks this special scripting variable in
[23:20] this special scripting variable in sketchy bar called sender the sender
[23:22] sketchy bar called sender the sender variable is the reason the script is
[23:24] variable is the reason the script is executing so over here we're checking if
[23:26] executing so over here we're checking if the reason for execution is the volume
[23:29] the reason for execution is the volume change event if it is then we Define
[23:32] change event if it is then we Define this variable called volume and assign
[23:34] this variable called volume and assign it the value of the info variable some
[23:37] it the value of the info variable some events in sketchy bar send additional
[23:39] events in sketchy bar send additional information through the info variable in
[23:42] information through the info variable in the case of the volume change event the
[23:44] the case of the volume change event the info variable will have the current
[23:46] info variable will have the current volume in percent so if the volume is
[23:49] volume in percent so if the volume is 60% then the value of info will be 60
[23:53] 60% then the value of info will be 60 then we have a switch statement here
[23:55] then we have a switch statement here which essentially defines a variable
[23:57] which essentially defines a variable called icon icon and assigns it a
[24:00] called icon icon and assigns it a specific icon depending on the Range
[24:04] specific icon depending on the Range that the volume is in so this here says
[24:07] that the volume is in so this here says that if the volume is within 60 to 100%
[24:12] that if the volume is within 60 to 100% then we're using this volume icon here
[24:15] then we're using this volume icon here for max volume and this one is for 30 to
[24:19] for max volume and this one is for 30 to 59% and this one is from 1 to
[24:23] 59% and this one is from 1 to 29% and then if it's anything else then
[24:26] 29% and then if it's anything else then we're assuming that the volume is muted
[24:29] we're assuming that the volume is muted now I want to use the SF symbols library
[24:31] now I want to use the SF symbols library for these icons instead again you can
[24:34] for these icons instead again you can look for these in the SF symbols app
[24:36] look for these in the SF symbols app that we downloaded earlier or you can
[24:38] that we downloaded earlier or you can get them from my blog post I'm just
[24:40] get them from my blog post I'm just going to paste them in here that's the
[24:42] going to paste them in here that's the first one this is the second one this is
[24:46] first one this is the second one this is the third one and this is the one we'll
[24:48] the third one and this is the one we'll use if the system is muted and then down
[24:51] use if the system is muted and then down here in the last line again we use the
[24:54] here in the last line again we use the name variable to know which item is
[24:57] name variable to know which item is invoking this script we want to change
[25:00] invoking this script we want to change its icon to the value of the icon
[25:03] its icon to the value of the icon variable and the label to the value of
[25:05] variable and the label to the value of the volume variable I'm going to save
[25:07] the volume variable I'm going to save this file and then I'm going to open up
[25:09] this file and then I'm going to open up the file explorer go down here to
[25:11] the file explorer go down here to sketchy bar RC and then below this line
[25:14] sketchy bar RC and then below this line where we're sourcing the calendar. sh
[25:17] where we're sourcing the calendar. sh file we want to copy this and paste it
[25:21] file we want to copy this and paste it and we're going to change this to volume
[25:24] and we're going to change this to volume let's save this file open up our
[25:26] let's save this file open up our terminal pane go down here and then run
[25:29] terminal pane go down here and then run sketchy bar Das D reload awesome so now
[25:32] sketchy bar Das D reload awesome so now we have the current volume percentage on
[25:35] we have the current volume percentage on the bar and if I change the volume the
[25:37] the bar and if I change the volume the event gets triggered and the percentage
[25:40] event gets triggered and the percentage and the icon
[25:43] and the icon changes all right now let's go back up
[25:46] changes all right now let's go back up here open the file explorer let's add a
[25:48] here open the file explorer let's add a new file under items called battery. sh
[25:52] new file under items called battery. sh which we'll use to show the current
[25:53] which we'll use to show the current battery percentage on our computer let's
[25:56] battery percentage on our computer let's open up the terminal pane again and then
[25:58] open up the terminal pane again and then let's do
[26:00] let's do chmod and use the up arrow and we're
[26:03] chmod and use the up arrow and we're going to change volume to battery Dosh
[26:06] going to change volume to battery Dosh now let's go back up into neovim
[26:08] now let's go back up into neovim maximize this and open up the battery.
[26:11] maximize this and open up the battery. sh file now I'm going to add the
[26:13] sh file now I'm going to add the following code we're adding a new item
[26:15] following code we're adding a new item called battery to the right side of the
[26:17] called battery to the right side of the screen we want it to update every 120
[26:20] screen we want it to update every 120 seconds where this script will run under
[26:23] seconds where this script will run under the plugins directory called battery. sh
[26:27] the plugins directory called battery. sh again we're going to be re using the
[26:29] again we're going to be re using the battery script that comes with the
[26:31] battery script that comes with the example configuration the last line here
[26:33] example configuration the last line here is a subscription for the battery item
[26:36] is a subscription for the battery item to the system woke event and the power
[26:39] to the system woke event and the power source change event so essentially what
[26:42] source change event so essentially what this means is that the battery script
[26:44] this means is that the battery script will run every 120 seconds or when the
[26:47] will run every 120 seconds or when the computer has awakened from sleep or when
[26:49] computer has awakened from sleep or when the power source for the computer has
[26:51] the power source for the computer has changed so if it's charging or not let's
[26:53] changed so if it's charging or not let's save this file let's open up the battery
[26:56] save this file let's open up the battery Dosh file under plug plugins so this
[26:59] Dosh file under plug plugins so this variable here will have the current
[27:01] variable here will have the current battery percentage this one will have
[27:04] battery percentage this one will have whether or not the computer is charging
[27:07] whether or not the computer is charging If the percentage is an empty string
[27:09] If the percentage is an empty string we'll just exit and not do anything else
[27:12] we'll just exit and not do anything else and then down here if the percentage is
[27:14] and then down here if the percentage is between 90 and 100 we'll use this icon
[27:18] between 90 and 100 we'll use this icon this one between 60 and 89 this one
[27:22] this one between 60 and 89 this one between 30 and 59 and then this one
[27:24] between 30 and 59 and then this one between 10 and 29 and in all other cases
[27:28] between 10 and 29 and in all other cases will show the empty battery icon again I
[27:30] will show the empty battery icon again I want to change these to SF symbols you
[27:33] want to change these to SF symbols you can use the SF symbols app to look for
[27:35] can use the SF symbols app to look for the icons that you would like I'm going
[27:37] the icons that you would like I'm going to add in the following which you can
[27:39] to add in the following which you can find in the blog
[27:42] find in the blog post then down here the icon changes for
[27:46] post then down here the icon changes for when it's charging I'm going to use the
[27:48] when it's charging I'm going to use the following from SF symbols and you'll see
[27:50] following from SF symbols and you'll see down here at the bottom we're setting
[27:52] down here at the bottom we're setting the icon to the icon variable and the
[27:54] the icon to the icon variable and the label to the current percentage let's
[27:56] label to the current percentage let's save this file I'm going to open up the
[27:58] save this file I'm going to open up the file explorer go down to sketchy bar RC
[28:02] file explorer go down to sketchy bar RC and down here I'm going to copy this
[28:04] and down here I'm going to copy this line paste it below it and I'm going to
[28:06] line paste it below it and I'm going to change this volume to battery. sh save
[28:10] change this volume to battery. sh save this file open up my other terminal Pane
[28:13] this file open up my other terminal Pane and then we can call sketchy
[28:17] and then we can call sketchy bar-- reload and you'll see now the
[28:20] bar-- reload and you'll see now the current battery percentage in the
[28:22] current battery percentage in the bar I'm going to go back up into neovim
[28:26] bar I'm going to go back up into neovim maximize this open the file explorer and
[28:29] maximize this open the file explorer and under here under items I'm going to add
[28:31] under here under items I'm going to add a new one called cpu. sh again we need
[28:34] a new one called cpu. sh again we need to make this executable so I'm going to
[28:36] to make this executable so I'm going to open up my terminal Pane and I'm going
[28:38] open up my terminal Pane and I'm going to use my up Arrow to look for chmod
[28:42] to use my up Arrow to look for chmod this will do and I'm going to change
[28:44] this will do and I'm going to change battery to cpu. sh and go back up
[28:48] battery to cpu. sh and go back up maximize neovim open up cpu. sh and I'm
[28:52] maximize neovim open up cpu. sh and I'm going to add the following code you'll
[28:54] going to add the following code you'll see here that we're adding a new item
[28:56] see here that we're adding a new item it's called CPU and it goes on the right
[28:58] it's called CPU and it goes on the right side of the screen we're setting an
[29:00] side of the screen we're setting an update frequency of two so this will
[29:03] update frequency of two so this will update every 2 seconds this is the icon
[29:06] update every 2 seconds this is the icon that we're using from SF symbols and
[29:09] that we're using from SF symbols and we're specifying a script let's save
[29:11] we're specifying a script let's save this file open up the file explorer and
[29:13] this file open up the file explorer and under plugins we're going to add a new
[29:16] under plugins we're going to add a new file called cpu. sh again we need to
[29:20] file called cpu. sh again we need to make this executable so I'm going to
[29:22] make this executable so I'm going to open up my other terminal pane go down
[29:24] open up my other terminal pane go down here and use the up arrow and change
[29:27] here and use the up arrow and change items two plugins I'm going to go back
[29:30] items two plugins I'm going to go back into neovim maximize it and open up this
[29:34] into neovim maximize it and open up this new file I'm going to paste in the
[29:36] new file I'm going to paste in the following code I didn't come up with
[29:38] following code I didn't come up with this code myself in the sketchy bar
[29:40] this code myself in the sketchy bar repository there's a bunch of examples
[29:42] repository there's a bunch of examples from different people and what they've
[29:43] from different people and what they've done with their configs and you can find
[29:45] done with their configs and you can find a lot of inspiration in there I'll have
[29:47] a lot of inspiration in there I'll have links to those relevant pages in the
[29:50] links to those relevant pages in the description if you want to explore the
[29:52] description if you want to explore the configs that other people have come up
[29:54] configs that other people have come up with essentially this line right here
[29:56] with essentially this line right here gets the current CPU percentage and
[29:58] gets the current CPU percentage and we're setting the label to be the
[30:00] we're setting the label to be the percentage let's save this file open up
[30:02] percentage let's save this file open up the file explorer go down to sketchy bar
[30:05] the file explorer go down to sketchy bar RC and then we're going to copy this
[30:07] RC and then we're going to copy this line paste below it and change battery
[30:10] line paste below it and change battery to cpu. sh let's save this file open up
[30:14] to cpu. sh let's save this file open up the terminal Pane and let's do sketchy
[30:18] the terminal Pane and let's do sketchy bar-- reload and now you can see this
[30:21] bar-- reload and now you can see this CPU percentage at the top which gets
[30:23] CPU percentage at the top which gets updated every 2 seconds all right now
[30:26] updated every 2 seconds all right now we're ready to add some it items to the
[30:28] we're ready to add some it items to the left side of the bar the first one is
[30:31] left side of the bar the first one is going to be for the current app that
[30:33] going to be for the current app that we're using but before we do this we're
[30:35] we're using but before we do this we're going to need to install the sketchy bar
[30:38] going to need to install the sketchy bar app font essentially this will allow us
[30:40] app font essentially this will allow us to take the name of an app and
[30:42] to take the name of an app and substitute it with an icon for it to
[30:45] substitute it with an icon for it to install it you'll run the following
[30:47] install it you'll run the following command let's press enter to execute it
[30:50] command let's press enter to execute it and then we'll use this next command to
[30:52] and then we'll use this next command to install a mapping function that will map
[30:55] install a mapping function that will map from a name to an icon in the f font
[30:58] from a name to an icon in the f font that we just installed let's press enter
[31:00] that we just installed let's press enter to install that if I go back up to
[31:03] to install that if I go back up to neovim if I open up the file explore
[31:06] neovim if I open up the file explore you'll see here that we have a new file
[31:08] you'll see here that we have a new file called icon mapor FN again we need to
[31:12] called icon mapor FN again we need to make this executable so I'm going to
[31:14] make this executable so I'm going to open up my other terminal pane go down
[31:17] open up my other terminal pane go down into it I'm going to use chmod and up
[31:21] into it I'm going to use chmod and up arrow and I'm going to change this
[31:24] arrow and I'm going to change this to Icon uncore map _ FN and make sure
[31:29] to Icon uncore map _ FN and make sure it's under plugins let's press enter now
[31:31] it's under plugins let's press enter now let's go back up into neovim open up
[31:34] let's go back up into neovim open up this icon mapor FN file and you'll see
[31:38] this icon mapor FN file and you'll see here that it's basically a function
[31:41] here that it's basically a function called icon map and then down here we
[31:43] called icon map and then down here we have a switch statement that uses the
[31:46] have a switch statement that uses the first argument passed to the function
[31:49] first argument passed to the function and then it checks if it matches a given
[31:52] and then it checks if it matches a given app name so for example if the app is
[31:55] app name so for example if the app is called figma then we're going to have a
[31:57] called figma then we're going to have a very variable called icon result that is
[32:00] very variable called icon result that is equal to colon figma colon now I'm just
[32:03] equal to colon figma colon now I'm just going to add a shebang here to the
[32:06] going to add a shebang here to the top like we did with our other files and
[32:10] top like we did with our other files and I'm going to go to the bottom of this
[32:11] I'm going to go to the bottom of this file and then I'm going to call this
[32:13] file and then I'm going to call this icon map function with the first
[32:17] icon map function with the first parameter that gets passed to this
[32:19] parameter that gets passed to this script and after calling this function
[32:22] script and after calling this function now the icon uncore result variable will
[32:25] now the icon uncore result variable will be defined and I want to Echo
[32:28] be defined and I want to Echo its
[32:30] its value and let's save this if I open up
[32:33] value and let's save this if I open up my other terminal Pane and I
[32:36] my other terminal Pane and I do/ plugins SL ion mapor fnsh and I pass
[32:44] do/ plugins SL ion mapor fnsh and I pass figma to it I'll get colon figma colon
[32:48] figma to it I'll get colon figma colon as output sketchy bar app font uses
[32:51] as output sketchy bar app font uses Colin figma colon to find the matching
[32:54] Colin figma colon to find the matching icon for figma I'm going to go back up
[32:56] icon for figma I'm going to go back up into neovim open the file explorer and
[32:59] into neovim open the file explorer and under items I'm going to add a new one
[33:02] under items I'm going to add a new one called
[33:03] called front app which we're going to use to
[33:05] front app which we're going to use to show the current active application down
[33:09] show the current active application down here I'm going to do chmod up arrow and
[33:13] here I'm going to do chmod up arrow and change this to items and the file is
[33:17] change this to items and the file is called front uncore app I'm going to go
[33:21] called front uncore app I'm going to go back up into neovim maximize it open up
[33:24] back up into neovim maximize it open up this file and now I'm going to add the
[33:26] this file and now I'm going to add the following you'll see here that we're
[33:27] following you'll see here that we're adding a new item it's called a front
[33:30] adding a new item it's called a front uncore app it's going to go on the left
[33:32] uncore app it's going to go on the left hand side of the bar we're changing the
[33:35] hand side of the bar we're changing the background color to be the accent color
[33:37] background color to be the accent color we defined in our color scheme the color
[33:40] we defined in our color scheme the color of the icon will be the same as the bar
[33:43] of the icon will be the same as the bar and the font for the icon is going to be
[33:45] and the font for the icon is going to be the sketchy bar app font which we just
[33:48] the sketchy bar app font which we just installed the color for the label will
[33:50] installed the color for the label will be the same as the bar as well and we're
[33:52] be the same as the bar as well and we're going to be using a script called front
[33:55] going to be using a script called front app and it's going to subscribe to to
[33:57] app and it's going to subscribe to to the sketchy bar front app switched event
[34:00] the sketchy bar front app switched event let's save this file open the file
[34:02] let's save this file open the file explorer and you'll see that we already
[34:04] explorer and you'll see that we already have a front unor app script let's open
[34:07] have a front unor app script let's open it up this script checks if the sender
[34:10] it up this script checks if the sender is the front app switched event and if
[34:13] is the front app switched event and if it is it updates the label with the
[34:16] it is it updates the label with the value of info which is the name of the
[34:19] value of info which is the name of the current active application to this we
[34:22] current active application to this we want to add an icon that's going to be
[34:24] want to add an icon that's going to be equal to dollar sign parenthe es so that
[34:28] equal to dollar sign parenthe es so that we get the output of a command and now
[34:30] we get the output of a command and now we want to get the path for the plugins
[34:33] we want to get the path for the plugins directory slash the
[34:36] directory slash the icon mapor fn. sh script and we want to
[34:41] icon mapor fn. sh script and we want to pass to this script the value of the
[34:43] pass to this script the value of the info environment variable which is the
[34:46] info environment variable which is the name of the active app so essentially
[34:48] name of the active app so essentially this will pass the name of the app to
[34:51] this will pass the name of the app to the icon map function which will in turn
[34:54] the icon map function which will in turn give us what the sketchy bar app font
[34:56] give us what the sketchy bar app font needs to to get the icon for the current
[34:59] needs to to get the icon for the current active application I hope that makes
[35:01] active application I hope that makes sense let's save this open up the file
[35:04] sense let's save this open up the file explorer let's go to the sketchy bar RC
[35:06] explorer let's go to the sketchy bar RC file and let's go above the right side
[35:10] file and let's go above the right side item section I'm going to add a new one
[35:13] item section I'm going to add a new one called left side
[35:16] called left side items and we're going to add here Source
[35:19] items and we're going to add here Source the value of item uncore directory slf
[35:23] the value of item uncore directory slf frore app. sh let's say save this and
[35:28] frore app. sh let's say save this and then let's open up our other terminal
[35:30] then let's open up our other terminal Pane and let's run sketchy
[35:33] Pane and let's run sketchy bar-- reload to see our changes it looks
[35:37] bar-- reload to see our changes it looks like we made a mistake in the front app
[35:39] like we made a mistake in the front app script let's go back up to neovim open
[35:42] script let's go back up to neovim open up the file explore and go to front app.
[35:45] up the file explore and go to front app. sh under
[35:47] sh under plugins and the problem is with this
[35:49] plugins and the problem is with this plugin uncore directory variable because
[35:51] plugin uncore directory variable because we don't have access to it let's change
[35:54] we don't have access to it let's change this to config under directory SL plug
[35:57] this to config under directory SL plug plugins instead and let's save this file
[36:00] plugins instead and let's save this file again open up our other terminal Pane
[36:02] again open up our other terminal Pane and call sketchy bar-- reload there we
[36:05] and call sketchy bar-- reload there we go now we see the icon and the name of
[36:07] go now we see the icon and the name of the current active application if I were
[36:09] the current active application if I were to open a different app let's say I open
[36:12] to open a different app let's say I open up notes for example you'll see now that
[36:14] up notes for example you'll see now that the icon and the name changes if I close
[36:18] the icon and the name changes if I close it and focus back on it term it changes
[36:21] it and focus back on it term it changes back awesome all right so now I want to
[36:24] back awesome all right so now I want to add some items to show the spaces that I
[36:27] add some items to show the spaces that I have on my computer and what
[36:29] have on my computer and what applications I have open in each space
[36:32] applications I have open in each space I'm going to go back up into neovim
[36:34] I'm going to go back up into neovim maximize it open the file explorer and
[36:36] maximize it open the file explorer and under items I'm going to add a new one
[36:38] under items I'm going to add a new one called spaces. sh again this needs to be
[36:42] called spaces. sh again this needs to be an executable so I'm going to go to my
[36:44] an executable so I'm going to go to my other terminal pane write out chmod use
[36:48] other terminal pane write out chmod use the up Arrow going to change this to
[36:52] the up Arrow going to change this to spaces. sh going to go back up maximize
[36:56] spaces. sh going to go back up maximize it and open up this this new file now
[36:58] it and open up this this new file now I'm going to add the following code this
[37:00] I'm going to add the following code this lineup here essentially defines an array
[37:03] lineup here essentially defines an array with space IDs from 1 to 10 then down
[37:07] with space IDs from 1 to 10 then down here we're using a for Loop to iterate
[37:10] here we're using a for Loop to iterate through the IDS and then for each one
[37:13] through the IDS and then for each one we're going to be adding a special item
[37:16] we're going to be adding a special item called space sketchy bar has several
[37:19] called space sketchy bar has several special items and one of them is the
[37:22] special items and one of them is the space item this is also called a special
[37:25] space item this is also called a special component what makes it special is that
[37:27] component what makes it special is that it only shows on the display that the
[37:30] it only shows on the display that the space is in so this would be especially
[37:32] space is in so this would be especially useful if you have more than one display
[37:34] useful if you have more than one display the name for the space will be space Dot
[37:37] the name for the space will be space Dot and the ID for it so for the first one
[37:39] and the ID for it so for the first one it'll be space do1 and we're going to
[37:42] it'll be space do1 and we're going to place it on the left side of the screen
[37:44] place it on the left side of the screen then we're going to use set to update
[37:46] then we're going to use set to update some of its properties we need to use
[37:48] some of its properties we need to use the name of the space and then this
[37:50] the name of the space and then this special property called space needs to
[37:53] special property called space needs to be equal to the ID of the space the icon
[37:56] be equal to the ID of the space the icon for will be the ID as well and then the
[37:59] for will be the ID as well and then the font for the label will be the sketchy
[38:02] font for the label will be the sketchy bar app font because we want to display
[38:05] bar app font because we want to display all of the different icons for the apps
[38:07] all of the different icons for the apps within a given space I'm also adding
[38:10] within a given space I'm also adding some extra padding to the right hand
[38:12] some extra padding to the right hand side of the label and a y offset of Nega
[38:15] side of the label and a y offset of Nega -1 so that the icons align properly
[38:18] -1 so that the icons align properly finally we're also specifying a script
[38:20] finally we're also specifying a script for it called space. sh let's save this
[38:24] for it called space. sh let's save this file open up the file explorer and
[38:26] file open up the file explorer and you'll see down here a script that
[38:28] you'll see down here a script that already exists called space. sh let's
[38:31] already exists called space. sh let's open that up now I'm going to delete
[38:33] open that up now I'm going to delete this line and I want to replace it with
[38:36] this line and I want to replace it with the following this line here loads the
[38:38] the following this line here loads the colors that we defined in the colors
[38:40] colors that we defined in the colors Dosh file and then for space components
[38:43] Dosh file and then for space components we have access to this special variable
[38:45] we have access to this special variable that lets us know if the space is
[38:47] that lets us know if the space is currently selected if it is I want the
[38:51] currently selected if it is I want the background to show so we said
[38:53] background to show so we said background. drawing to on I want the
[38:56] background. drawing to on I want the color color of the background to be our
[38:58] color color of the background to be our accent color and the color for the label
[39:02] accent color and the color for the label and the icon to be the bar color if it
[39:05] and the icon to be the bar color if it isn't selected I want the background to
[39:08] isn't selected I want the background to be turned off this should be drawing and
[39:11] be turned off this should be drawing and the color of the label and the icon to
[39:14] the color of the label and the icon to be the accent color now let's save this
[39:16] be the accent color now let's save this open up the file explorer go down to
[39:18] open up the file explorer go down to sketchy bar RC and then let's copy this
[39:23] sketchy bar RC and then let's copy this line and paste it below it and we're
[39:26] line and paste it below it and we're going to change front app to spaces. SH
[39:30] going to change front app to spaces. SH now I'm going to open up my other
[39:32] now I'm going to open up my other terminal Pane and run sketchy bar--
[39:37] terminal Pane and run sketchy bar-- reload actually I want this to be above
[39:40] reload actually I want this to be above front app so let's move that save it and
[39:44] front app so let's move that save it and then run sketchy bar-- reload again
[39:47] then run sketchy bar-- reload again there we go all right so now you can see
[39:48] there we go all right so now you can see these spaces on my computer in the bar
[39:51] these spaces on my computer in the bar and if I change through them they get
[39:54] and if I change through them they get highlighted let's go back to space one
[39:57] highlighted let's go back to space one now I also want to add the icons of the
[39:58] now I also want to add the icons of the active apps in each space let's go back
[40:01] active apps in each space let's go back up into neovim open the file explorer go
[40:03] up into neovim open the file explorer go to the spaces. sh file now I want to add
[40:07] to the spaces. sh file now I want to add the following code to the bottom I'm
[40:10] the following code to the bottom I'm adding a new item called space separator
[40:13] adding a new item called space separator it uses this icon the icon will use the
[40:15] it uses this icon the icon will use the accent color it'll have a padding of
[40:17] accent color it'll have a padding of four to the left and we won't have a
[40:20] four to the left and we won't have a label for it so we set label. drawing to
[40:23] label for it so we set label. drawing to off and we also don't want to show the
[40:24] off and we also don't want to show the background so we set background drawing
[40:27] background so we set background drawing to off we also specify a script for it
[40:31] to off we also specify a script for it and it's going to be called spacecore
[40:33] and it's going to be called spacecore windows we also subscribe to an event
[40:36] windows we also subscribe to an event and it's called space Windows change and
[40:39] and it's called space Windows change and it's pretty self-explanatory it'll
[40:41] it's pretty self-explanatory it'll execute the script whenever the windows
[40:43] execute the script whenever the windows in a space change let's save this file
[40:46] in a space change let's save this file open the file explorer and let's add a
[40:48] open the file explorer and let's add a new file under plugins called
[40:51] new file under plugins called spacecore windows. sh after doing this
[40:55] spacecore windows. sh after doing this we need to make it executable
[40:57] we need to make it executable so let's go back down to this terminal
[40:59] so let's go back down to this terminal pane write out chmod up Arrow let's
[41:03] pane write out chmod up Arrow let's change items to plugins and spaces to
[41:08] change items to plugins and spaces to spacecore windows. sh let's go back up
[41:12] spacecore windows. sh let's go back up into neovim maximize this open up this
[41:15] into neovim maximize this open up this new file and we're going to add the
[41:16] new file and we're going to add the following code over here we have an if
[41:19] following code over here we have an if statement that checks if the event
[41:21] statement that checks if the event executing the script is the space
[41:24] executing the script is the space Windows change event we're using JQ
[41:27] Windows change event we're using JQ which is the Json processor that we
[41:30] which is the Json processor that we installed in the beginning of this video
[41:32] installed in the beginning of this video to get the ID of the space from Json
[41:35] to get the ID of the space from Json information that is stored in the info
[41:38] information that is stored in the info variable and then down here we're
[41:40] variable and then down here we're getting the apps that are found in that
[41:42] getting the apps that are found in that space if apps isn't empty then we use a
[41:46] space if apps isn't empty then we use a while loop to read through them and we
[41:48] while loop to read through them and we use our icon map function script passing
[41:51] use our icon map function script passing in the name of the app so we can get the
[41:54] in the name of the app so we can get the right icon through the sketchy bar app
[41:56] right icon through the sketchy bar app font these are concatenated to a
[41:58] font these are concatenated to a variable called icon unor strip if there
[42:01] variable called icon unor strip if there are no apps then the icon strip will
[42:04] are no apps then the icon strip will just be this string and then finally in
[42:06] just be this string and then finally in the bottom we call set and we target
[42:09] the bottom we call set and we target space. the idea of a space so if the
[42:12] space. the idea of a space so if the windows changed in space one this will
[42:15] windows changed in space one this will be space. one and the label for it will
[42:18] be space. one and the label for it will be the icon strip let's save this file
[42:22] be the icon strip let's save this file and then let's open up our other
[42:23] and then let's open up our other terminal Pane and let's call sketchy bar
[42:27] terminal Pane and let's call sketchy bar D-
[42:28] D- reload awesome so as you can see here I
[42:31] reload awesome so as you can see here I only have one window open and it's in
[42:33] only have one window open and it's in the first space and that's it term let's
[42:36] the first space and that's it term let's say I open up notes now you can see it
[42:39] say I open up notes now you can see it show up in space one but if I move it to
[42:41] show up in space one but if I move it to a different space I can do this with a
[42:43] a different space I can do this with a shortcut I've configured through your
[42:46] shortcut I've configured through your buy I moved it to space three and you
[42:48] buy I moved it to space three and you can see it show up in space three now if
[42:50] can see it show up in space three now if I go to space three I'm going to close
[42:52] I go to space three I'm going to close it and it should go away and now I'm
[42:54] it and it should go away and now I'm going to go back to space one and iterm
[42:58] going to go back to space one and iterm pretty awesome all right we're almost
[42:59] pretty awesome all right we're almost done we just have one item left which is
[43:02] done we just have one item left which is for the current music being played on
[43:04] for the current music being played on the computer let's go up into neovim
[43:07] the computer let's go up into neovim maximize it open up the file explorer
[43:09] maximize it open up the file explorer and let's go to the items folder add a
[43:13] and let's go to the items folder add a new item called media Dosh again we need
[43:16] new item called media Dosh again we need to make it executable so down here we're
[43:19] to make it executable so down here we're going to do chmod up Arrow it's going to
[43:22] going to do chmod up Arrow it's going to be
[43:24] be items and media
[43:27] items and media Sweet let's go back into neovim maximize
[43:30] Sweet let's go back into neovim maximize it open up this file and I'm going to
[43:33] it open up this file and I'm going to add the following
[43:34] add the following code we're adding a new item the name is
[43:39] code we're adding a new item the name is called media and we're using e to place
[43:41] called media and we're using e to place it to the right of the notch you can use
[43:44] it to the right of the notch you can use Center instead but because my 14in
[43:47] Center instead but because my 14in MacBook has a notch I'm using this
[43:49] MacBook has a notch I'm using this instead if you want to do left side of
[43:51] instead if you want to do left side of the notch you can use Q then we're going
[43:53] the notch you can use Q then we're going to set some properties for the media
[43:55] to set some properties for the media item the label color is is going to be
[43:57] item the label color is is going to be the accent color we're going to set a
[43:59] the accent color we're going to set a Max characters property so if the
[44:01] Max characters property so if the current song that's playing is way too
[44:04] current song that's playing is way too long we just truncate it to 22
[44:06] long we just truncate it to 22 characters padding of the icon to the
[44:08] characters padding of the icon to the left is going to be zero so it's going
[44:09] left is going to be zero so it's going to be pretty close to the notch this is
[44:11] to be pretty close to the notch this is a pretty awesome and special property
[44:13] a pretty awesome and special property scroll text if it's set to on and the
[44:16] scroll text if it's set to on and the label has a max characters limit of 22
[44:20] label has a max characters limit of 22 then it'll sroll the text in 15-second
[44:22] then it'll sroll the text in 15-second intervals to create a pretty cool effect
[44:25] intervals to create a pretty cool effect we'll see that in a second the icon is
[44:27] we'll see that in a second the icon is from SF symbols its color is the accent
[44:30] from SF symbols its color is the accent color we don't want to show the
[44:32] color we don't want to show the background and we're going to be using a
[44:33] background and we're going to be using a script under the plugins directory
[44:35] script under the plugins directory called media finally we want to
[44:37] called media finally we want to subscribe to an event called media
[44:39] subscribe to an event called media change essentially this event will fire
[44:41] change essentially this event will fire whenever what's playing changes but do
[44:44] whenever what's playing changes but do note that as of right now it's
[44:46] note that as of right now it's experimental I'm going to save this file
[44:48] experimental I'm going to save this file open up the file explorer and under
[44:50] open up the file explorer and under plugins I'm going to add a new file
[44:53] plugins I'm going to add a new file called media. sh this is going to be for
[44:55] called media. sh this is going to be for our scen script I'll open up the other
[44:58] our scen script I'll open up the other terminal Pane and write out chmod use up
[45:02] terminal Pane and write out chmod use up arrow and this is going to be plugins
[45:05] arrow and this is going to be plugins instead of items awesome let's go back
[45:08] instead of items awesome let's go back into neovim maximize it open up this
[45:12] into neovim maximize it open up this file and I'm going to add the following
[45:14] file and I'm going to add the following code again the info variable is a Json
[45:17] code again the info variable is a Json string and we're using JQ to process it
[45:21] string and we're using JQ to process it and get the state of the media if state
[45:26] and get the state of the media if state is is playing then we want to get the
[45:28] is is playing then we want to get the title and the artist of the track and
[45:31] title and the artist of the track and assign it to the media variable and then
[45:33] assign it to the media variable and then we're going to use set to update the
[45:36] we're going to use set to update the label of the media item to be the title
[45:39] label of the media item to be the title and the artist and we set drawing to on
[45:42] and the artist and we set drawing to on so that it shows up on the bar if it
[45:45] so that it shows up on the bar if it isn't playing then we disable drawing
[45:48] isn't playing then we disable drawing and set it to off so that we no longer
[45:50] and set it to off so that we no longer see it on the bar now I'm going to save
[45:52] see it on the bar now I'm going to save this file open up the file explorer go
[45:54] this file open up the file explorer go down here to sketchy bar r RC and I'm
[45:57] down here to sketchy bar r RC and I'm going to add here a new section called
[46:00] going to add here a new section called right side of Notch items and we're
[46:04] right side of Notch items and we're going to do Source the item directory
[46:09] going to do Source the item directory media. sh and save this file I'm going
[46:12] media. sh and save this file I'm going to open up my other terminal Pane and
[46:14] to open up my other terminal Pane and call sketchy
[46:16] call sketchy bar-- reload now I just need to start
[46:18] bar-- reload now I just need to start playing a song on my computer for this
[46:21] playing a song on my computer for this to work now I started playing a song as
[46:23] to work now I started playing a song as you can see here to the right of the
[46:24] you can see here to the right of the notch we get the song name and the name
[46:26] notch we get the song name and the name of the artist and it starts to scroll
[46:29] of the artist and it starts to scroll every 15
[46:32] every 15 seconds pretty awesome what I want to
[46:34] seconds pretty awesome what I want to show you guys now is that I put together
[46:36] show you guys now is that I put together a wallpaper pack for the eight different
[46:38] a wallpaper pack for the eight different color schemes that I've put together for
[46:39] color schemes that I've put together for the bar I'm going to minimize iterm I'm
[46:42] the bar I'm going to minimize iterm I'm going to open up my wallpaper settings
[46:45] going to open up my wallpaper settings and you'll see here the different
[46:46] and you'll see here the different wallpapers that I put together this teal
[46:48] wallpapers that I put together this teal wallpaper down here should go with this
[46:50] wallpaper down here should go with this bar that I'm currently showing I'm going
[46:52] bar that I'm currently showing I'm going to select this one and you can see now
[46:55] to select this one and you can see now the general idea of having them match if
[46:57] the general idea of having them match if you want to change the color scheme
[46:59] you want to change the color scheme let's open up iterm again and go back
[47:01] let's open up iterm again and go back into neovim going to go over to colors.
[47:05] into neovim going to go over to colors. sh open that up you want to uncomment
[47:08] sh open that up you want to uncomment the color scheme that you want to use so
[47:10] the color scheme that you want to use so let's say I don't want this teal color
[47:12] let's say I don't want this teal color scheme but I want this gray one I'm
[47:14] scheme but I want this gray one I'm going to save this then I'm going to do
[47:16] going to save this then I'm going to do sketchy bar-- reload now we get the gray
[47:20] sketchy bar-- reload now we get the gray color scheme up top going to minimize it
[47:23] color scheme up top going to minimize it term and I'm going to change the
[47:26] term and I'm going to change the wallpaper again to this gray one and
[47:28] wallpaper again to this gray one and there you
[47:30] there you go all right you guys that's it for this
[47:33] go all right you guys that's it for this video I hope you enjoyed it if you did
[47:35] video I hope you enjoyed it if you did don't forget to leave a like down below
[47:37] don't forget to leave a like down below let me know in the comments section if
[47:38] let me know in the comments section if you have any questions or feedback for
[47:40] you have any questions or feedback for me and don't forget to subscribe to the
[47:42] me and don't forget to subscribe to the channel to see more content like this
[47:44] channel to see more content like this from me see you guys in the next one
All frames
Total: 40. Hero frames flagged with star.
frames/frame_0001.jpg(t=00:00)frames/frame_0002.jpg(t=01:28)frames/frame_0003.jpg(t=03:00)frames/frame_0004.jpg(t=04:11)frames/frame_0005.jpg(t=05:23)frames/frame_0006.jpg(t=06:35)frames/frame_0007.jpg(t=07:47)frames/frame_0008.jpg(t=08:59)frames/frame_0009.jpg(t=10:11)frames/frame_0010.jpg(t=10:52)frames/frame_0011.jpg(t=12:34)frames/frame_0012.jpg(t=13:46)frames/frame_0013.jpg(t=14:58)frames/frame_0014.jpg(t=16:10)frames/frame_0015.jpg(t=17:22)frames/frame_0016.jpg(t=18:34)frames/frame_0017.jpg(t=19:45)frames/frame_0018.jpg(t=20:57)frames/frame_0019.jpg(t=22:09)frames/frame_0020.jpg(t=23:21)frames/frame_0021.jpg(t=24:33)frames/frame_0022.jpg(t=25:45)frames/frame_0023.jpg(t=26:56)frames/frame_0024.jpg(t=28:08)frames/frame_0025.jpg(t=29:20)frames/frame_0026.jpg(t=30:32)frames/frame_0027.jpg(t=31:44)frames/frame_0028.jpg(t=32:56)frames/frame_0029.jpg(t=34:08)frames/frame_0030.jpg(t=35:19)frames/frame_0031.jpg(t=36:31)frames/frame_0032.jpg(t=37:43)frames/frame_0033.jpg(t=38:55)frames/frame_0034.jpg(t=40:07)frames/frame_0035.jpg(t=41:19)frames/frame_0036.jpg(t=42:30)frames/frame_0037.jpg(t=43:42)frames/frame_0038.jpg(t=44:54)frames/frame_0039.jpg(t=46:06)frames/frame_0040.jpg(t=47:47)